Allocate, reclaim, and schedule enterprise credits
Allocate by member count, move unused credits, adjust group limits, and configure monthly balance targets or group additions.
Updated: September 2026
Use Enterprise organization management → Credit allocation for immediate allocation, reclaiming, transfers, and monthly schedules. Organization administrators manage organization-wide settings. Group managers can use the permitted allocation and reclaiming functions for their assigned groups; this does not grant authority over other groups or organization-wide schedules.
In shared spending mode, members use a common group balance. In isolated spending mode, each member needs an individual allocation. Group and member allocations use the organization's existing credits; they do not purchase or create additional organization credits.
Screenshots show actual v7.1925 components in the Korean interface with the fictional Hanbit Group and sample data. Names, emails, and amounts are not real customer records. No real allocations, account or permission changes, or emails were made to produce these examples. Each procedure is a separate example, so people, counts, and amounts may differ between screenshots. Menus depend on organization settings and your permissions; labels in your selected language may differ.
Allocate immediately by member count
This feature uses the selected groups' member counts and a per-member amount to set remaining balances to a target. It does not simply add the entered amount to existing balances.
- Select Credit allocation → Allocate/reclaim (immediate) → Allocate by member count.
- Under Target groups, choose All active groups or one particular group.
- Enter the Amount per member. You can also use the 10,000, 20,000, 30,000, and 50,000 shortcuts.
- Click Preview allocation.
- Check the target groups and membership count, total allocation, Organization total remaining, Available for this selection, any shortfall, and the notices.
- If the result is correct, click Allocate. Preview again if you change the targets or amount.
Example: If HR has four active members and the amount is 20,000 per member, the group's balance after allocation is 80,000. In isolated spending mode, each member's remaining balance is set to 20,000. If Haneul Kim had 5,000 left, the result is 20,000, not 25,000. Existing usage records are preserved. In shared spending mode, the group balance is set to 80,000 without creating individual member limits.
To allocate more to one group, select that group instead of All active groups, enter a different per-member amount, and preview and apply it. Other groups are outside that operation's scope. In isolated groups, secondary memberships are excluded from the headcount and personal allocation, so a member is allocated only in their primary group; shared groups still count secondary memberships.
The preview's If fully consumed every month estimate is a funding reference that assumes the selected targets consume the full amount each month. Allocating on this screen does not enable monthly automatic allocation.
If Member balance targets automatic allocation is already in use, a Change recurring allocation amount button appears instead of this input flow. Open it and choose Add this month's difference or Apply from next month in the schedule screen. This avoids allocating a second full amount independently of the current month's award basis.
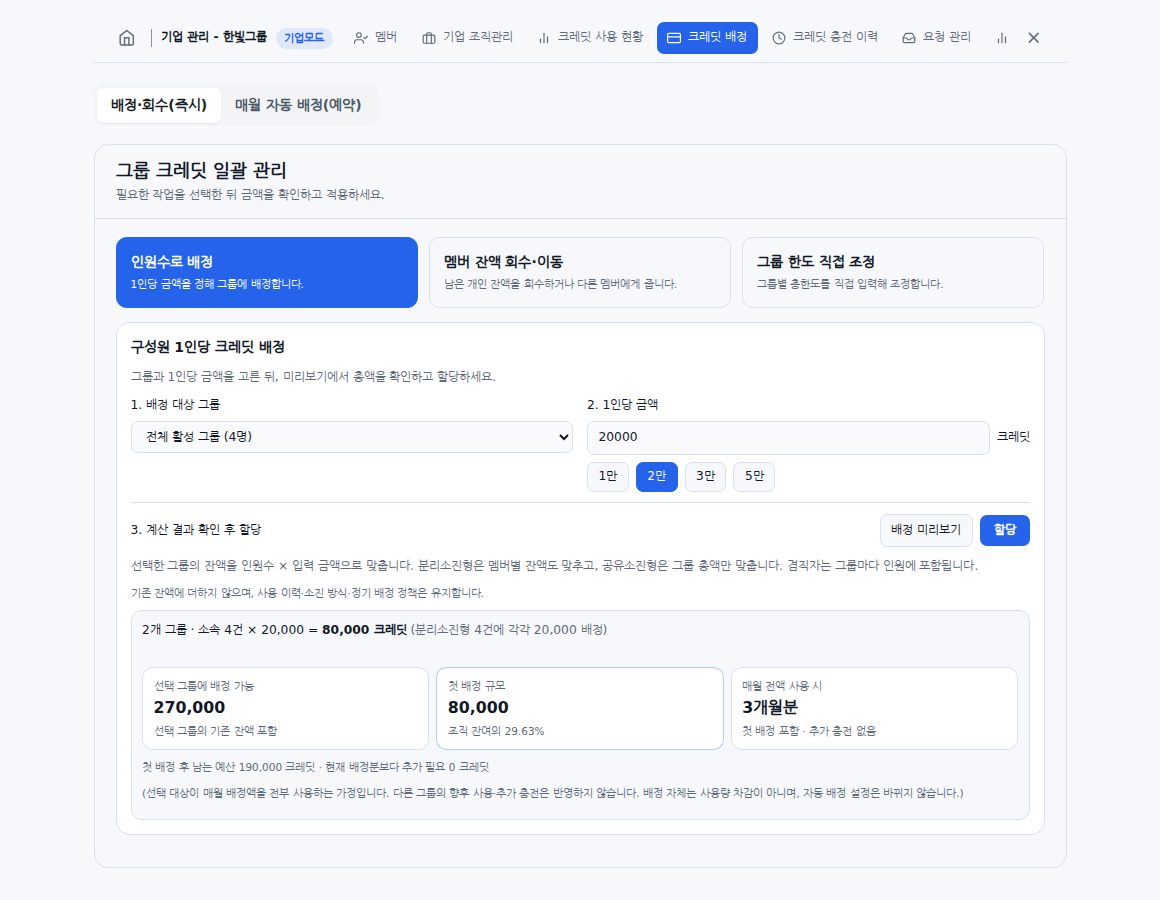
Example screen: allocation by member count for all active groups. The count represents group memberships. Previewing does not allocate credits.
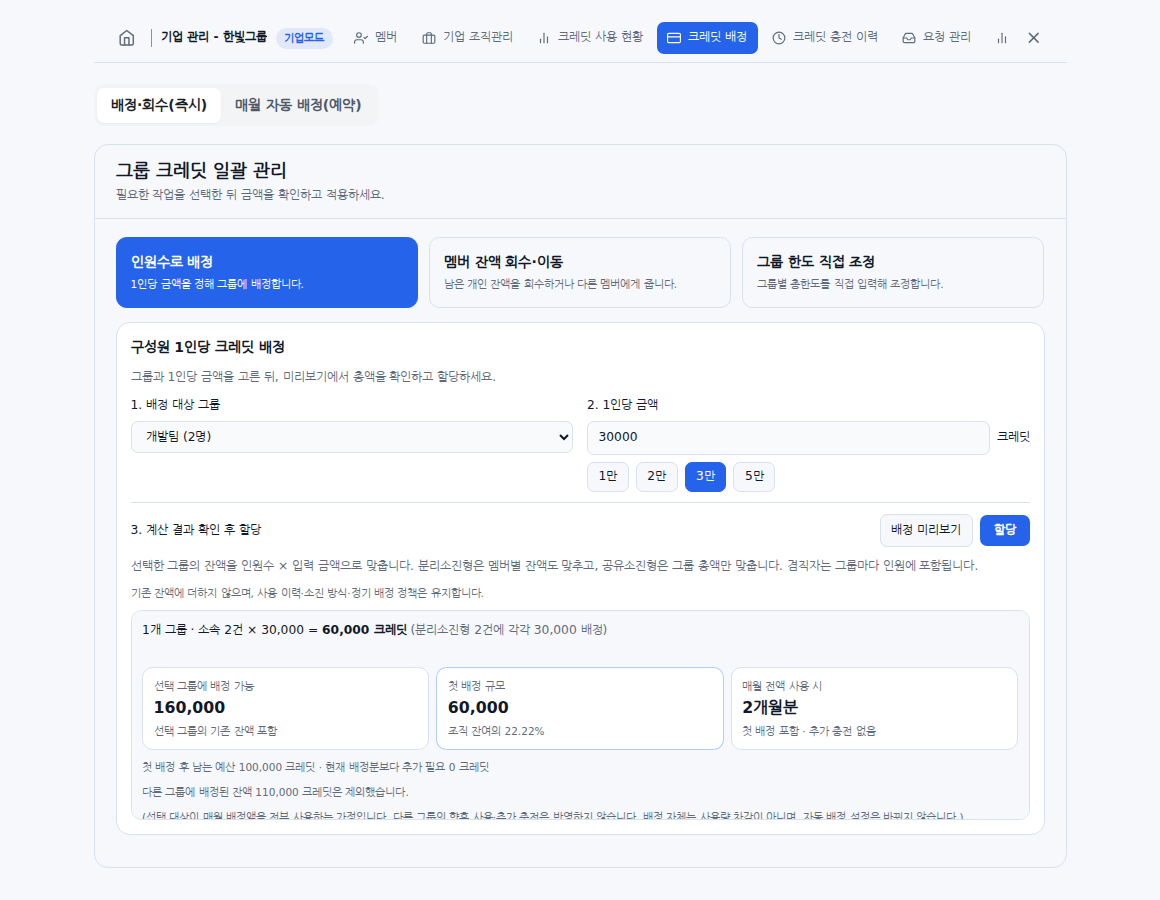
Example screen: 30,000 per member for Development only. You can select one group. Check both the per-member amount and the target group.
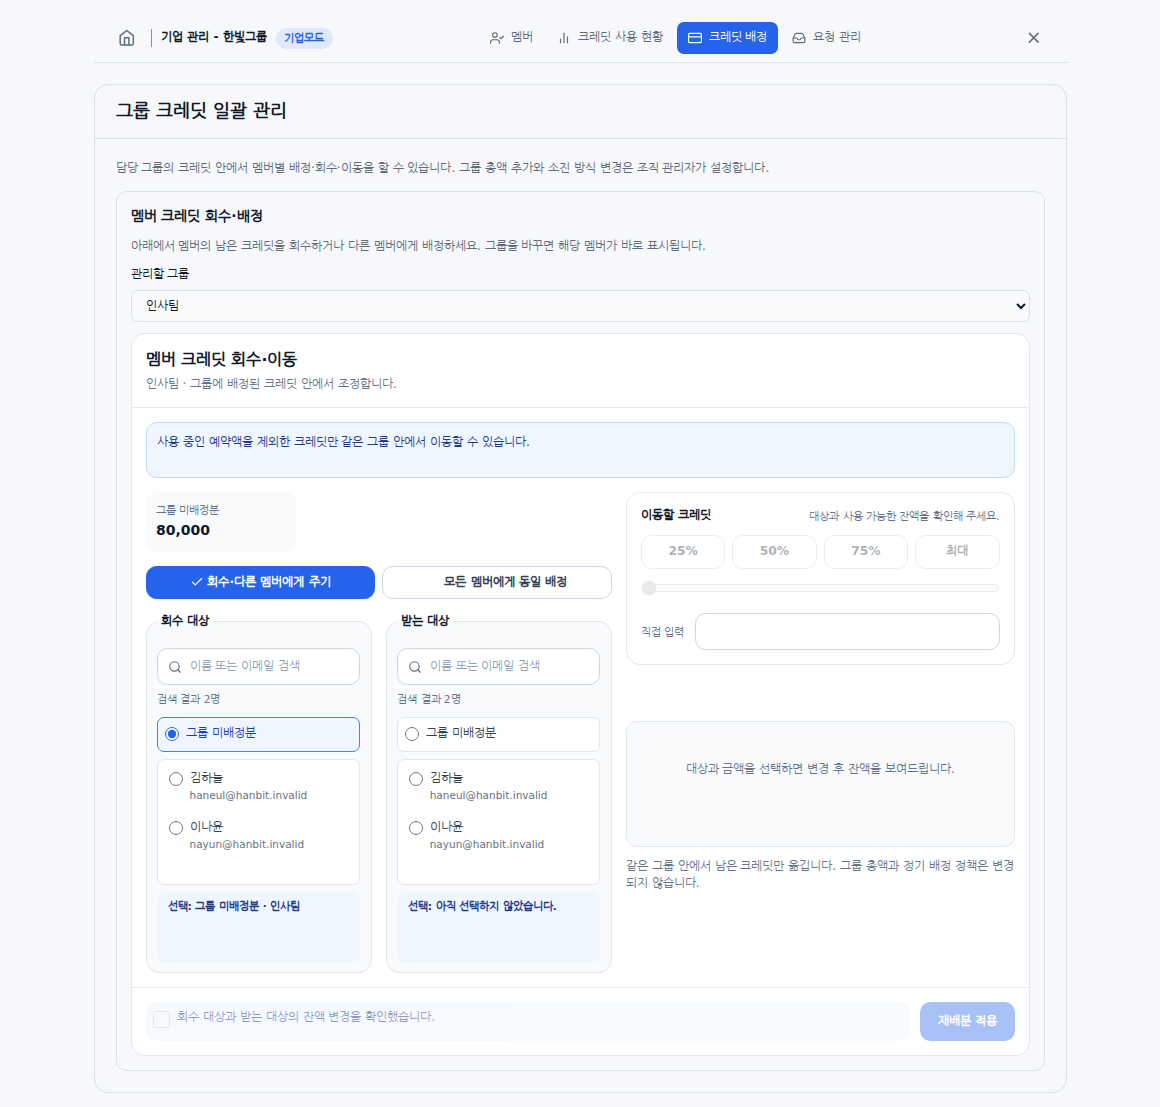
Example screen: a group manager's allocation scope. This is an actual component with a fictional organization and sample data. Match the targets and buttons to the procedure above.
Reclaim or move members' remaining credits
Organization administrators open Allocate/reclaim (immediate) → Reclaim/move member balances. Group managers open their assigned group's Reclaim/allocate member credits area under Credit allocation. In the current interface, you make these adjustments directly on the page without opening a separate modal.
Give credits to one member or move them between members
- Under Group to manage, select the target group in isolated spending mode.
- Select Reclaim/give to another member.
- Choose the Source and Recipient. You can search by name or email.
- Enter the Credits to transfer. Use 25%, 50%, 75%, Maximum, or the percentage slider within the currently transferable amount. Use Manual entry for an exact amount.
- In Preview changes, check the before-and-after balances and the group's unallocated balance.
- Check I have reviewed the changes to the source and recipient balances.
- Click Apply redistribution.
| Source | Recipient | Result |
|---|---|---|
| Member | Group unallocated balance | Reclaim the member's unused credits into the group |
| Group unallocated balance | Member | Give the member credits from the group's unallocated balance |
| Member A | Member B | Move A's unused credits to B within the same group |
For example, with no pending reservations, A has 15,000 left and B has 5,000. Transferring 10,000 leaves A with 5,000 and B with 15,000. The group's total and the recurring allocation policy do not change.
If many people match a search, the first 20 are shown. Enter more of the name or email to narrow the results. A selected member remains displayed separately even if they are outside the current search results. Check both the results and the current selection.
Credits reserved for requests in progress cannot be reclaimed. If you see Request in progress or Settlement pending for departed/transferred members, adjust only the amount excluding those protected credits. You cannot reclaim credits already used or transfer directly to another group.
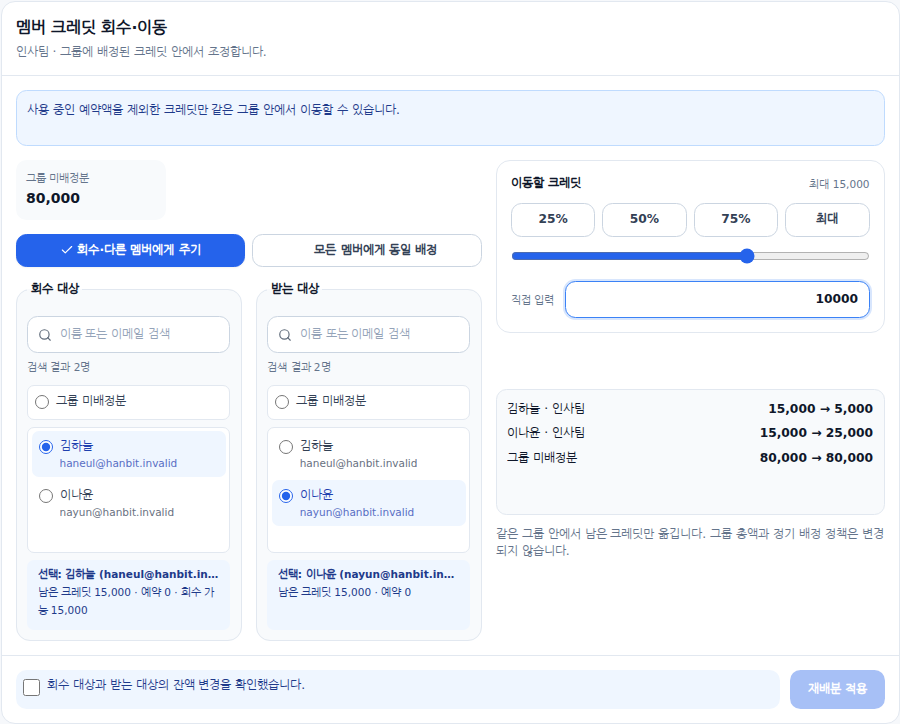
Example screen: moving unused member credits. Select the source, recipient, and amount in that order. The slider and percentage shortcuts can also adjust the amount.
Set equal balances for all members in one group
- On the same screen, select Allocate equally to all members.
- Enter the Credits per member.
- Check each member's before-and-after balance and the group's unallocated balance.
- Check I have reviewed all member balance changes, then click Allocate.
This also sets each member's balance to the entered amount instead of adding that amount. It can use only credits already allocated to the group and cannot lower a balance below amounts protected for pending requests. Changing the amount or targets clears the confirmation checkbox, so review the new preview again.
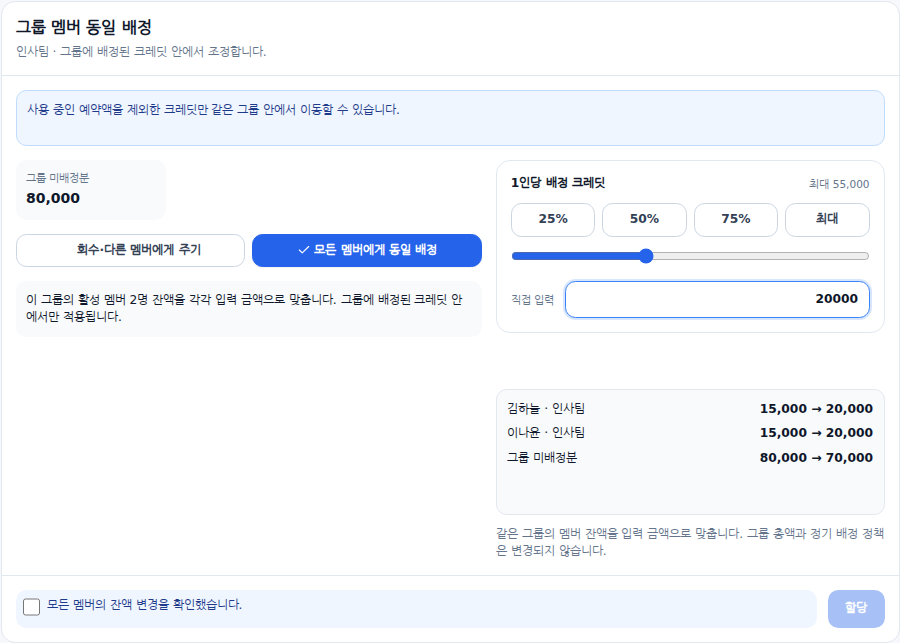
Example screen: equal allocation to all members in one group. This is an actual component with fictional data. Check the targets and buttons against the steps above.
Adjust group limits directly
For organization administrators: Open Credit allocation → Allocate/reclaim (immediate) → Adjust group limits directly.
The New limit on this screen is the total limit including credits already used, not the balance you want to leave. If usage is 10,000 and you want 20,000 remaining, enter 30,000.
- Check each group's Usage, Minimum required, and Current limit in the table.
- Enter a New limit for each group you want to change. A blank field means no change. You can also use +10,000 and -10,000.
- Check the total allocated group limits and the organization's total. A new limit cannot be lower than the displayed minimum required amount.
- Review N groups with pending changes at the bottom, then click Apply limits in bulk (N).
- In the Apply group credits in bulk confirmation, review the full target count and changes before confirming.
Because some credits have already been used or allocated to members, you cannot arbitrarily lower limits based only on the remaining balance. Correct invalid inputs first. If the bulk operation encounters a problem, the entire operation stops instead of applying only some groups.
The Company filter (display only) narrows the visible rows. Pending changes for other, hidden companies are still included in the bulk operation. Inputs remain when you switch tasks; the task card's N changes indicator shows them. Return and review the complete set of changes before applying.
Fill in multiple group limits quickly
Expand Enter multiple groups at once.
- Distribute proportionally by member count: Enter the total to distribute. The action fills new limits based on member counts and minimum required limits.
- Set equal amounts in bulk: Enter credits per group to fill each group's new limit.
- Download template → Upload: Edit the New limit column in the downloaded Excel file and upload it as .xlsx. Blank cells mean no change. Review the resulting table after uploading.
These steps prepare inputs. Actual limits change only when you click Apply limits in bulk (N). These operations use the full target group set regardless of the company filter, so do not assume the filter limits their scope.
If another administrator has changed the data or usage has changed, a Review changes or Refresh notice may appear. Compare the latest values with your draft. Clear inputs empties your draft inputs. If an error leaves the outcome unclear, check current balances and execution records before attempting to allocate the same amount again.
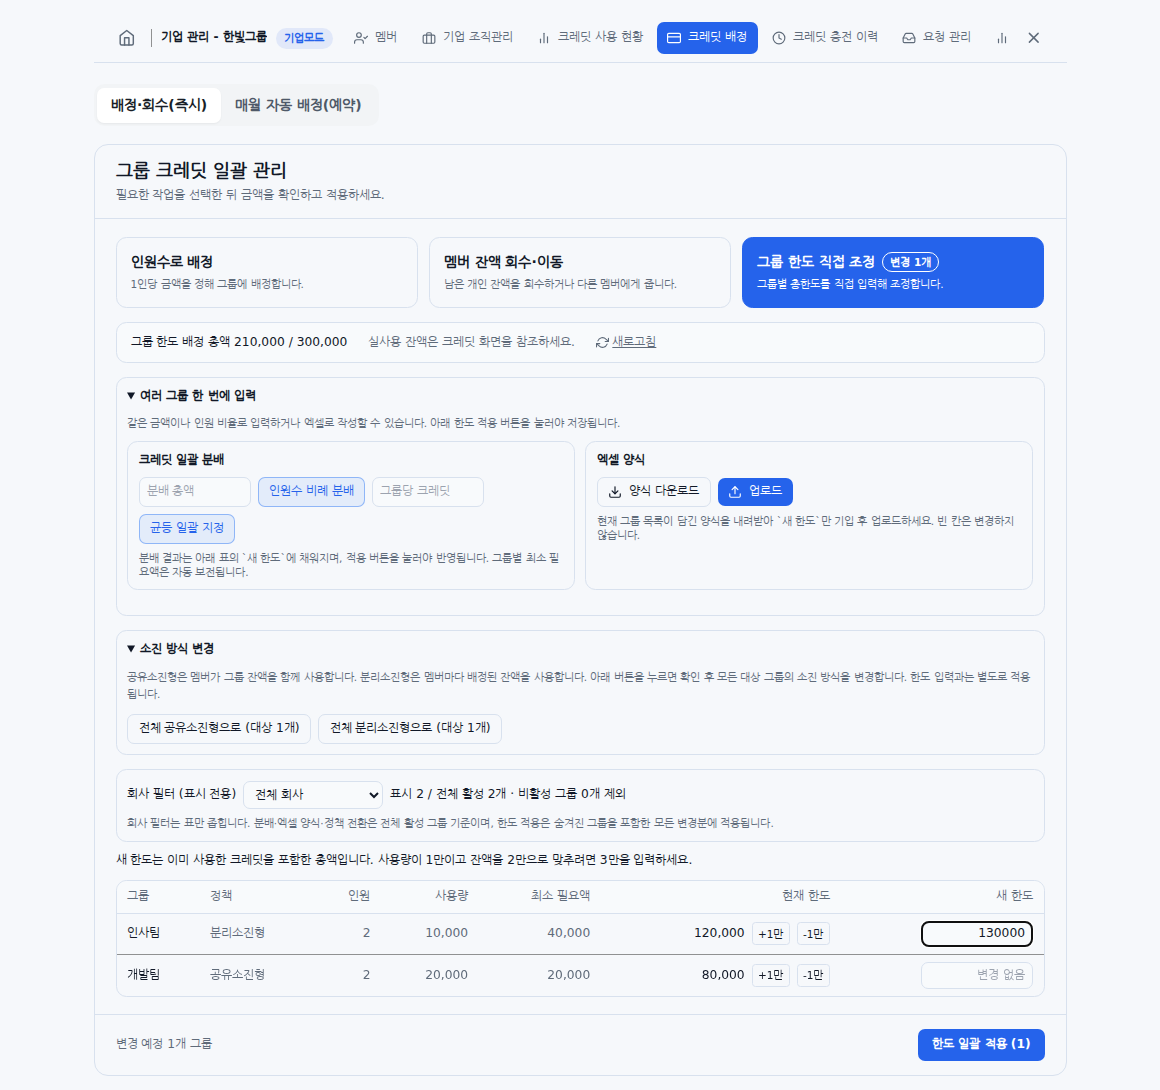
Example screen: direct group-limit and spending-mode adjustments. This is an actual component with fictional data. Check the targets and buttons against the procedure above.
Switch between shared and isolated spending
- Expand Change spending mode.
- Select Switch all to shared spending (N targets) or Switch all to isolated spending (N targets).
- Read the targets and changes in the confirmation dialog, then confirm.
This is separate from entering new limits in the table and runs immediately after confirmation. Groups hidden by the company filter may be included, so check the target count on the button.
Switching from shared to isolated spending can initialize member allocations to zero. The group balance does not disappear, but members need individual allocations before they can spend. After switching, allocate member balances through Allocate by member count or Reclaim/move member balances. Administrators themselves are not exempt. If settlement is in progress or the current policy is incompatible, follow the notice and resolve that state first.
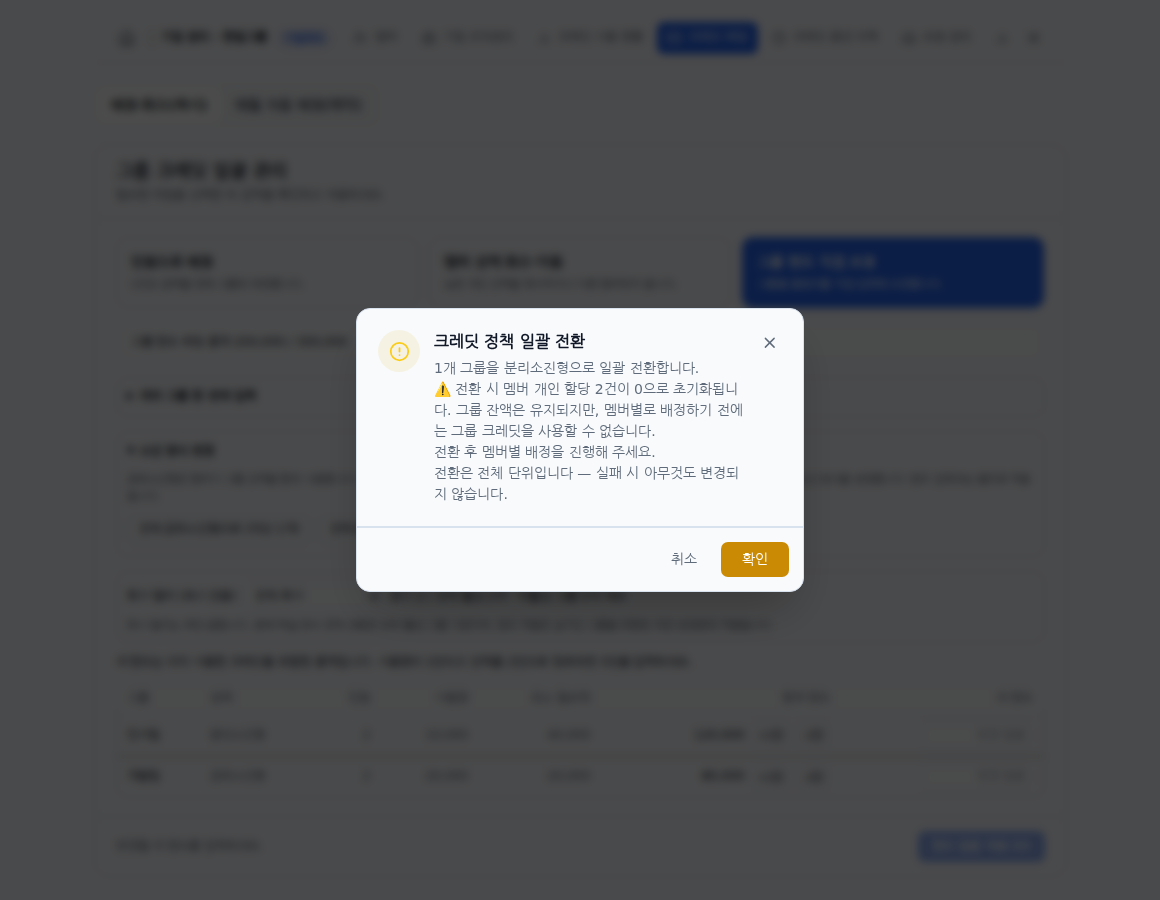
Example screen: confirmation before switching to isolated spending. This is an actual component with fictional data. Review the affected targets and changes.
Choose a monthly automatic allocation method
Open Credit allocation → Monthly automatic allocation (scheduled) to check both methods' status and next scheduled run. Click Refresh allocation status if the displayed status may be outdated.
| Method | Example: balance 5,000 before allocation, configured amount 20,000 | Main purpose |
|---|---|---|
| Member balance targets | Set the member's balance to 20,000 at the next allocation | Keep a consistent monthly spending budget per member |
| Add amounts to groups | Add 20,000 to the group balance, making it 25,000 | Add funding monthly while preserving unused group credits |
Selecting either screen does not change the operating method. Each keeps its own configured amounts and execution history. Both allocate from existing organization credits; purchasing or adding credits to the organization is separate.
If a member balance target policy is registered, you cannot also enable group amount additions. Pausing balance targets does not switch the organization to the addition method. Conversely, if group additions are enabled, disable them and save before creating a balance target policy. Amounts already allocated do not automatically transfer to a different method. If your organization needs to switch an existing policy, ask its administrator to check the configuration.
Configure member balance targets
Set up for the first time or save a schedule only
- Open Monthly automatic allocation (scheduled) → Member balance targets → Base policy and exceptions.
- Enter the base amount under Per member.
- Turn on Enable automatic allocation to repeat it monthly.
- Select the Monthly allocation day. Runs use 00:00 KST; if the date does not exist in a month, they use that month's final day.
- Enter any group or member exceptions you need.
- To schedule without changing current balances, click Save settings.
- After saving, check Saved next run. Missed months are not paid retroactively as multiple months of allocations.
The first actual application of the policy switches all active groups in the organization to isolated spending. It covers all active groups regardless of company or search filters, and a member with secondary memberships is allocated only in the primary group (secondary memberships keep their management rights, and any credit left on them is reclaimed at the next scheduled allocation). Review the full scope; this is not a way to apply the policy to just one group first.
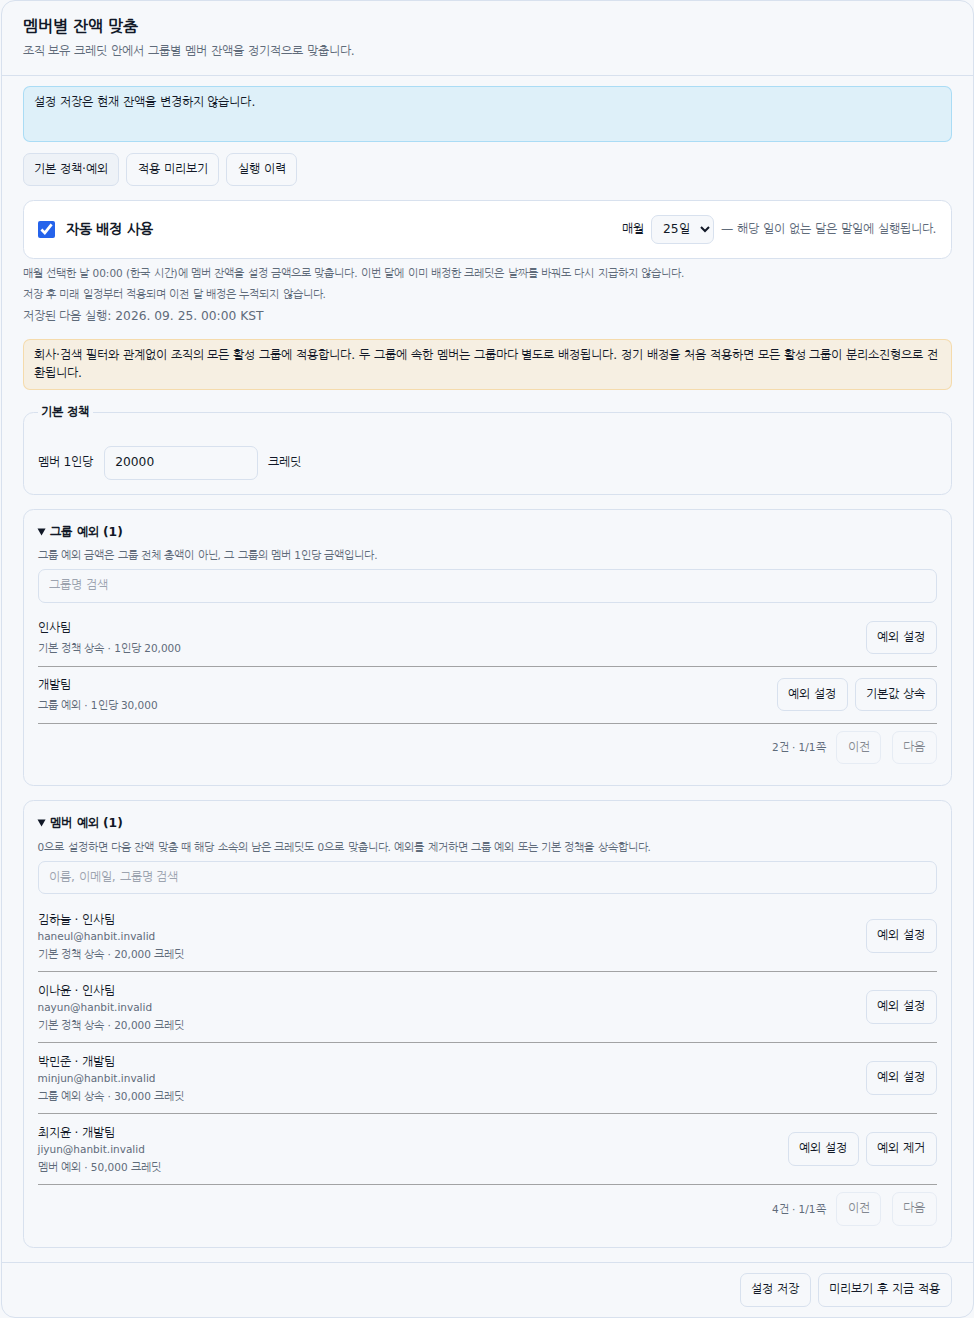
Example screen: recurring balance targets, schedule, and exceptions. Set the base amount and day, then add exceptions only where needed. Review the target scope before saving.
Set current balances now
This procedure applies to initial setup or a non-recurring allocation state. For a policy with an established automatic allocation basis for the current month, use Add this month's difference / Apply from next month below.
- Prepare the settings, then click Preview and apply now.
- In Application preview, check the target groups and membership count, next total allocation, planned reclaiming and replenishment, available organization credits, and any shortfall.
- Check individual results under Member remaining credits: current → after application. You can search by name, email, or group name and use previous/next pages.
- Check the balance-change confirmation.
- Click Apply now.
Balance targets do not keep adding unused balances. If A has 5,000 and B has 30,000 left and the target is 20,000, A is replenished and B's excess is reclaimed, leaving both with 20,000. If organization funds are insufficient or pending requests prevent a safe adjustment, the entire allocation is held.
Turn off Enable automatic allocation and click Save settings to pause scheduled runs. This does not reclaim balances already allocated or delete the policy.
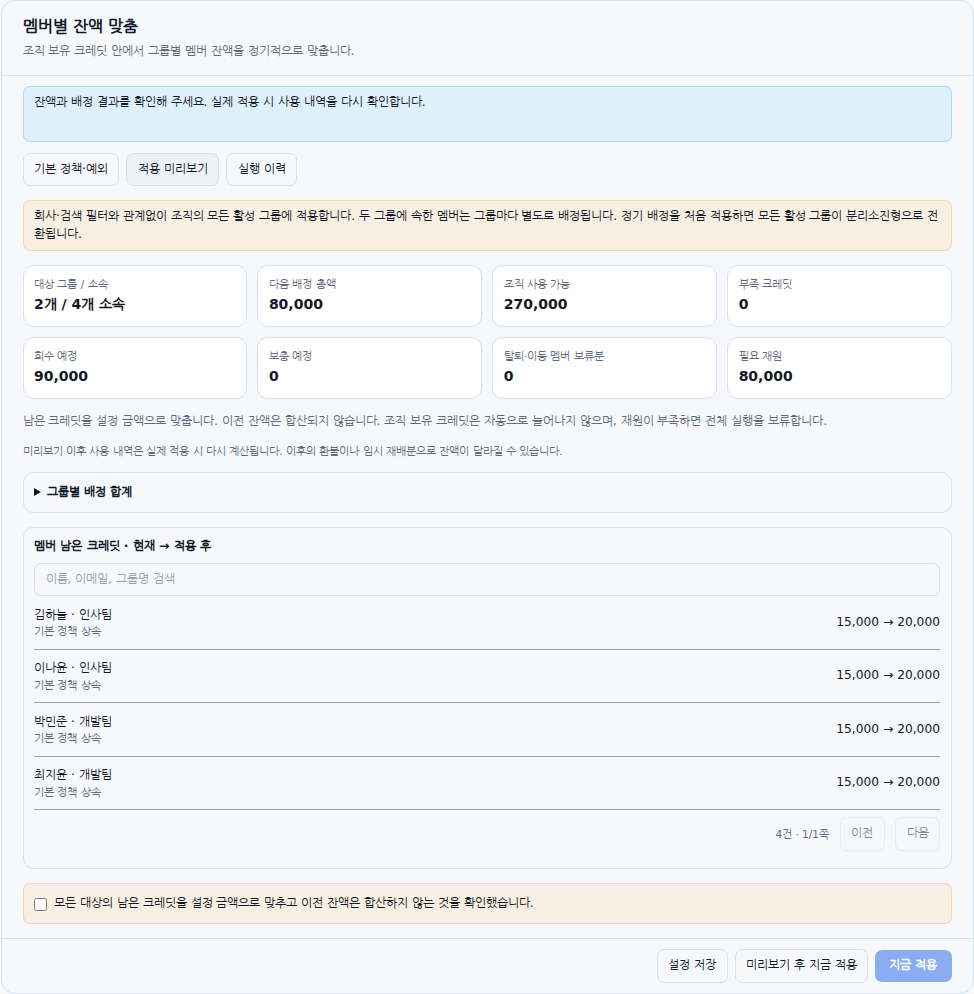
Example screen: preview before the first balance target application. This is an actual component with a fictional organization and sample data. Review the targets and controls against the steps above.
Allocate more to one group
- Expand Group exceptions (N) and find the group.
- Click its Set exception button.
- Enter Exception credits, then click Apply exception.
- Finish saving the overall settings or previewing and applying the changes.
A group exception is the amount per member in that group, not the group's total. If the base is 20,000 and Development's exception is 30,000, each active Development member uses 30,000 as their allocation target. To return to the base amount, click Inherit default, then save or apply the overall change.
Set a different amount for one member
- Expand Member exceptions (N).
- Search by name, email, or group name, and verify the exact Member · Group.
- Enter the exception using Set exception → Exception credits → Apply exception.
- Finish saving the overall settings or previewing and applying the changes.
The priority is Member exception → Group exception → Base policy. Even if Development's group exception is 30,000, a member exception of 50,000 for Haneul Kim in that group sets Haneul's target to 50,000. If the same person also belongs to HR, the exception for their HR membership is separate.
Remove exception restores the applicable group exception or base policy. This is different from entering zero. Zero means the next balance target run also sets that membership's balance to zero; it does not delete the member. Inactive exceptions · excluded from current allocation are old exceptions outside the currently active targets. Remove them if appropriate, then save the overall settings.
Apply exception only adds the value to the draft policy. Clicking it alone does not save to the server or allocate credits. While an exception editor is open, complete Apply exception or Cancel before saving the overall settings.
Increase 20,000 to 30,000: choose this month or next month
Organizations with an established automatic allocation basis for this month choose an Effective date option.
| Option | This month | From next month |
|---|---|---|
| Apply immediately · add this month's difference | Add only the 10,000 difference between the original 20,000 and new 30,000 to the current balance | Set the balance to the new 30,000 target |
| Apply from next month | Keep the current balance unchanged | Set the balance to the new 30,000 target |
Someone with 8,000 remaining will have 18,000 after immediate application. It does not refill their current balance to 30,000 or add a full 30,000. For group and member exception changes, review the preview using the amount actually applicable to each membership.
- Edit the base amount or exceptions.
- Select Apply immediately · add this month's difference or Apply from next month.
- Click Preview changes.
- Check this month's total difference or the first effective month, then check the balance-change confirmation.
- Click Add this month's difference or Save from next month.
To lower an amount, use Apply from next month. Difference calculations may be held if the current month's baseline allocation is missing or the initial allocation is still pending, so first check execution history and current allocation status. Saving for next month does not reclaim or immediately allocate this month's balance.
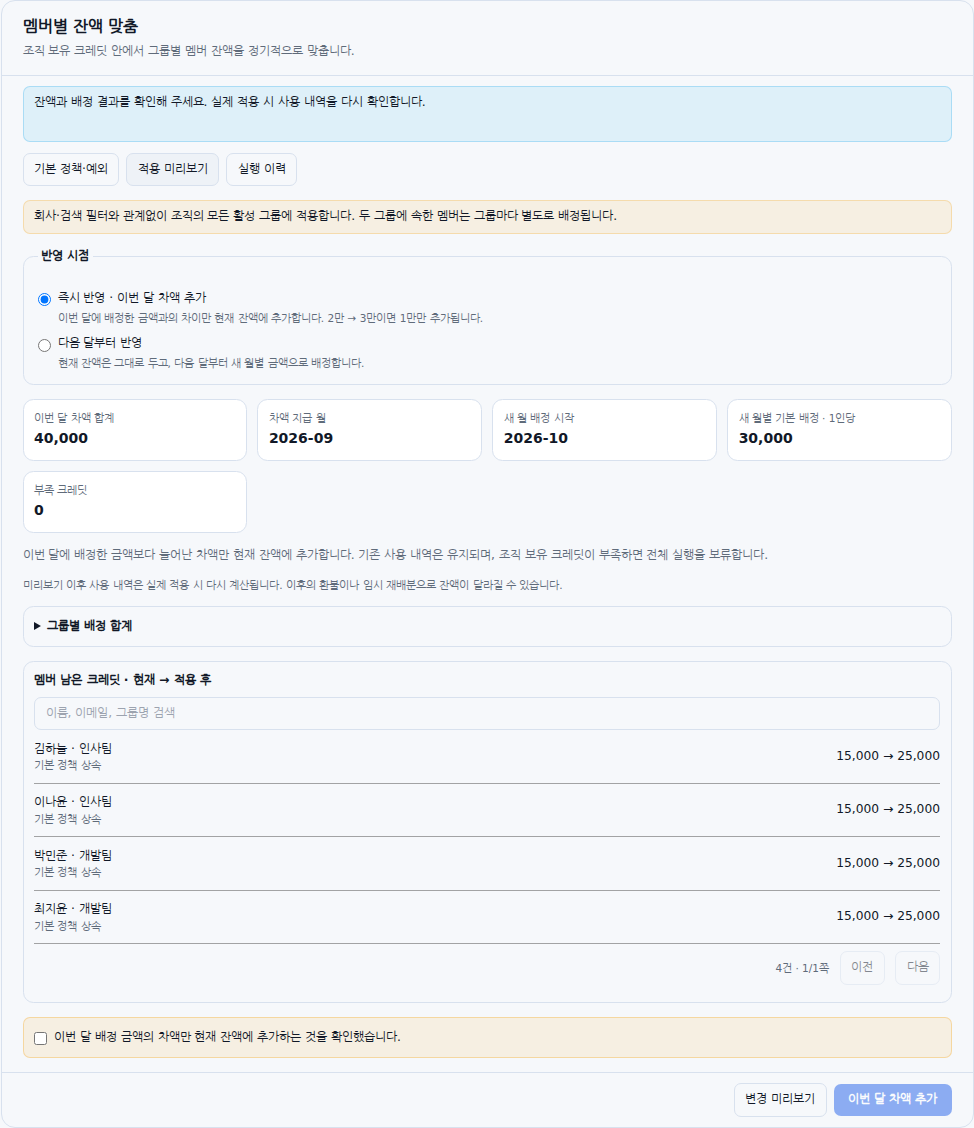
Example screen: increasing this month's allocation basis from 20,000 to 30,000 adds only the 10,000 difference this month.
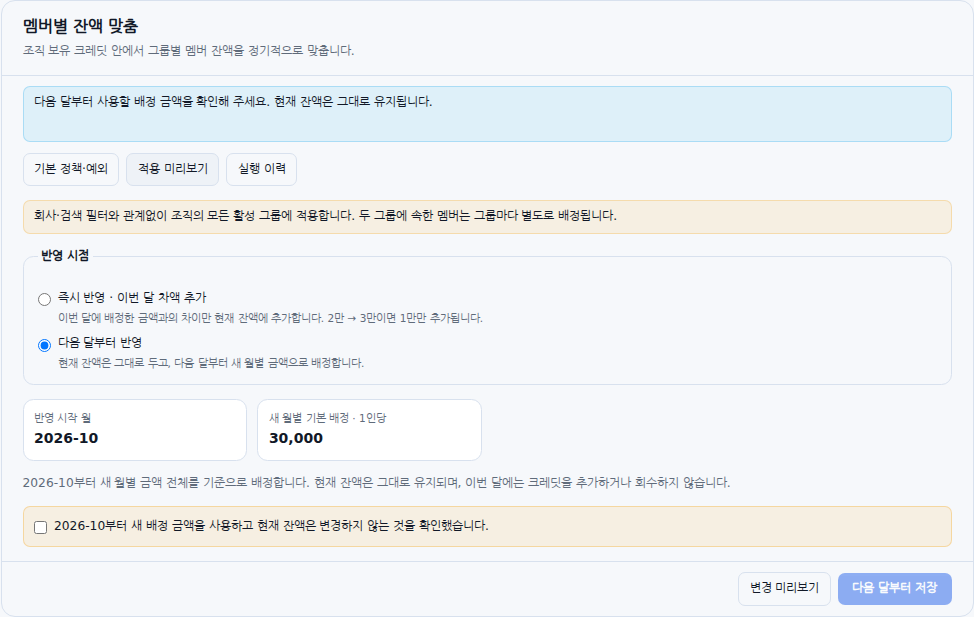
Example screen: applying from next month keeps current balances unchanged and uses the new amount from the next run.
Change only the allocation day
For an active automatic policy with an established allocation basis, changing only the Monthly allocation day while keeping amounts and exceptions unchanged reveals Save allocation day change. Use Save settings for initial setup or a paused policy. This saves the schedule without changing current balances. It does not pay an already funded month again or bring forward an amount reserved for next month. For an unpaid allocation this month, the new date applies; if that date has already passed, it moves to next month. Always check Saved next run after saving.
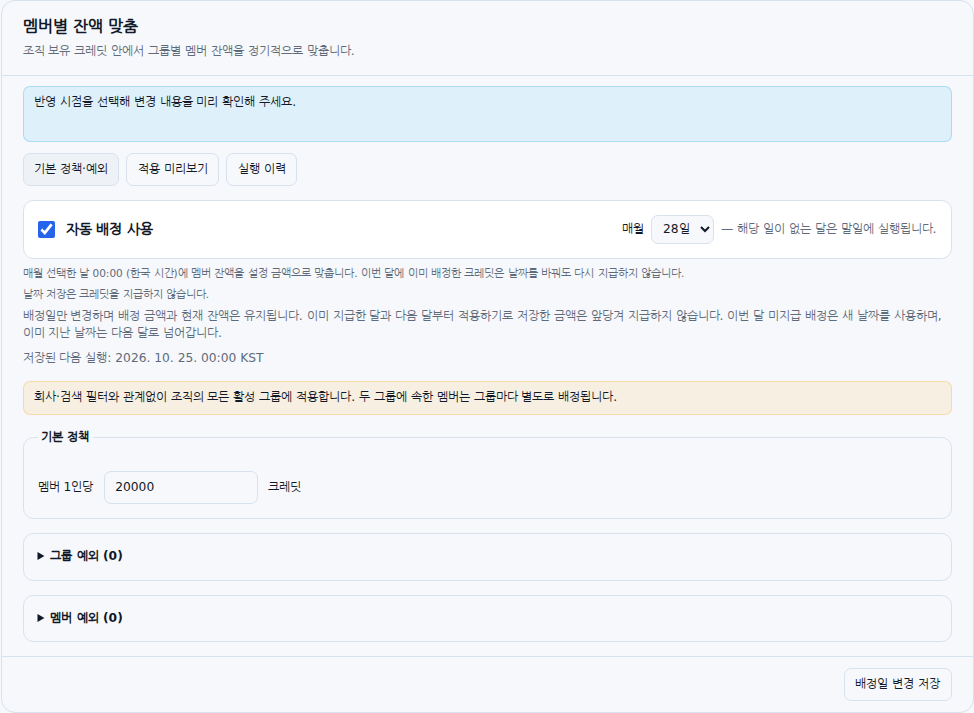
Example screen: changing the allocation day without changing amounts. This is an actual component with fictional data. Review the controls against the procedure above.
Check execution history
Open Execution history to distinguish Scheduled run, Apply now, Add this month's difference, and Save next month's settings. Check Completed, Entire allocation held, Failed, Expired, and Pending, along with any shortfall reason. Use View details for completed runs and Load older history for earlier records.
An ordinary Save settings operation changes no balance and may not create a balance-application history entry. Distinguish settings saved successfully from allocation actually completed. On the scheduled date, check execution history and Credit usage status for the result.
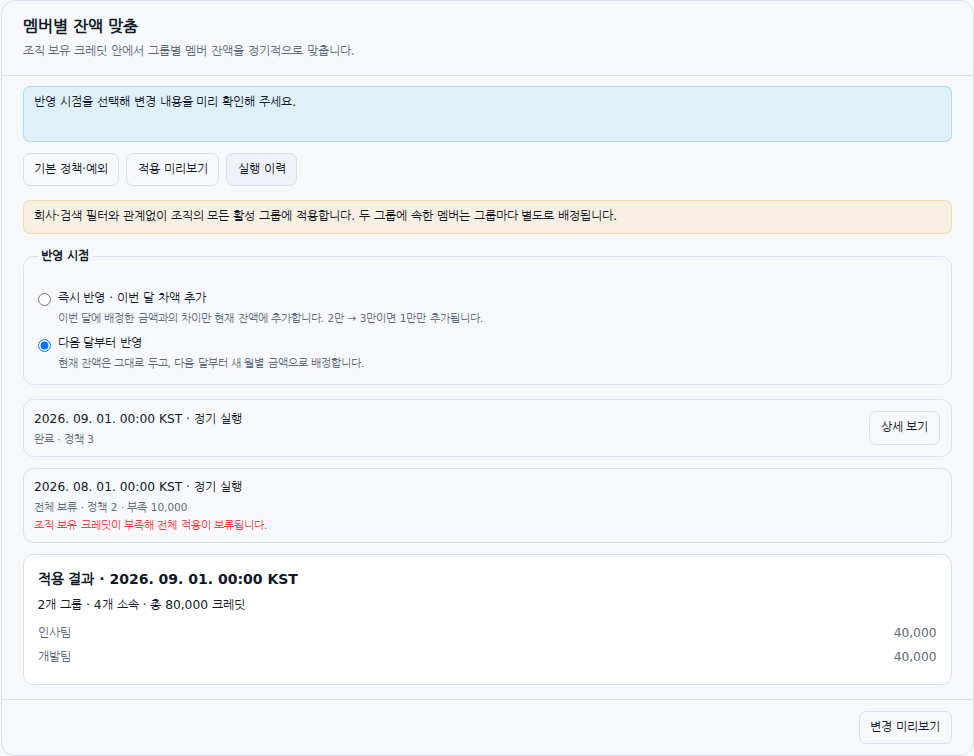
Example screen: recurring allocation history and detailed results. This is an actual component with a fictional organization and sample data. Check the relevant run and its result.
Configure monthly additions to groups
Open Credit allocation → Monthly automatic allocation (scheduled) → Add amounts to groups. This method adds the configured amount to a group's remaining credits. In isolated spending mode, it does not automatically distribute the amount into individual member balances.
- Turn on Enable automatic top-up and select the Monthly top-up day. If that date does not exist in a month, the month's final day is used.
- Select target groups under Add group… or click Add all. You can register up to 200 groups.
- Enter each group's Monthly top-up amount. Verify that the default amount in newly added rows is what you intend.
- Set priority with the Up and Down arrows. Remove unwanted rows using the trash icon.
- Check Configured total (maximum requested), Allocation needed for this attempt, and Available allocation budget.
- Click Save. Saving updates the configuration; it does not arbitrarily bring forward next month's allocation.
- Once this month's scheduled date is due, you can click Run now to process unfinished targets. If the inputs have changed, Save before running is shown; save first.
If organization funds are insufficient, groups are processed in priority order, stopping at the first target marked Not funded from here. This differs from member balance targets, which hold the entire operation when funds are insufficient. After securing funds, use Run now or wait for the next automatic retry. Targets already completed in the same month are not paid again.
Remaining balance is at least three months of top-ups is a reference indicator for groups with substantial unused credits. It does not mean automatic reclaiming. Review group-limit adjustments separately if needed.
In Recent execution history, check each target's status, such as Funded, Not funded (insufficient credits), Inactive target, or Mode mismatch. Inactive targets are not paid. Targets added after this month's run has completed start receiving additions next month.
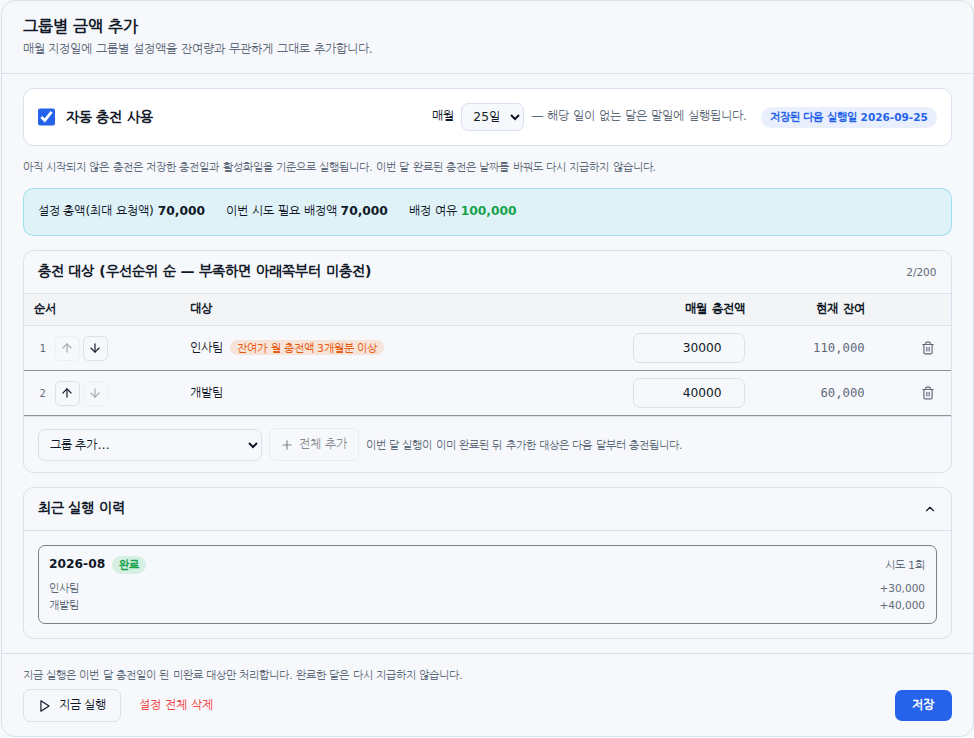
Example screen: monthly additions to groups. This is an actual component with fictional data. Check the target groups, amounts, and controls.
Change the top-up day, pause, or delete settings
- Edit the date and click Save. Top-ups that have not started follow the saved day and activation date. Changing the day does not pay this month's completed targets again.
- A run that has already started this month keeps its original scheduled date. Unfunded targets can be retried when the feature remains enabled and conditions recover. Check Original scheduled date or Saved next run date on screen.
- To pause, turn off Enable automatic top-up and click Save.
- To remove the target list as well, click Delete all settings, read the confirmation, and confirm. Execution history remains. This does not reclaim credits already allocated.
When a button is disabled or credits are not allocated
| What you see | What to check |
|---|---|
| The group has credits, but a member cannot spend | Check for isolated spending and a zero member allocation limit or balance; allocate to that member |
| No member list for reclaiming in shared spending mode | A shared balance does not require reclaiming individual member balances |
| The apply button is disabled | Check targets, amount, a current preview, the balance-change confirmation, insufficient funds, and hold reasons |
| Another administrator changed the settings | Reload, compare the latest state with your draft, and review a fresh preview |
| Request in progress or settlement pending | Wait for completion, then reload the latest balances |
| This month's difference cannot be added | Check whether this month's baseline allocation completed, whether the amount is being reduced, and the current isolated-spending and recurring-policy state |
| A schedule was saved but no execution history appears | Saving settings and allocating credits are different; check the saved next run and whether the feature is enabled |
| Group additions cannot be enabled because a balance target policy exists | The methods cannot operate together; pausing does not switch methods |
| Recurring allocation is not installed / settings are paused | See the service-administrator guidance below |
| The connection failed during application and the result is unknown | Check current balances and execution history before repeating the same operation |
When contacting the service administrator
Provide the organization name, intended method, exact on-screen notice, saved next run, and execution-history status. The service administrator can check installation and activation of recurring allocation, isolated-spending availability, and registration of the automatic job. Ordinary organization administrators do not need to modify server settings or jobs. Automatic allocation applies only to organizations that individually enable it, and the service must have the scheduled execution environment ready. The time basis is midnight KST.
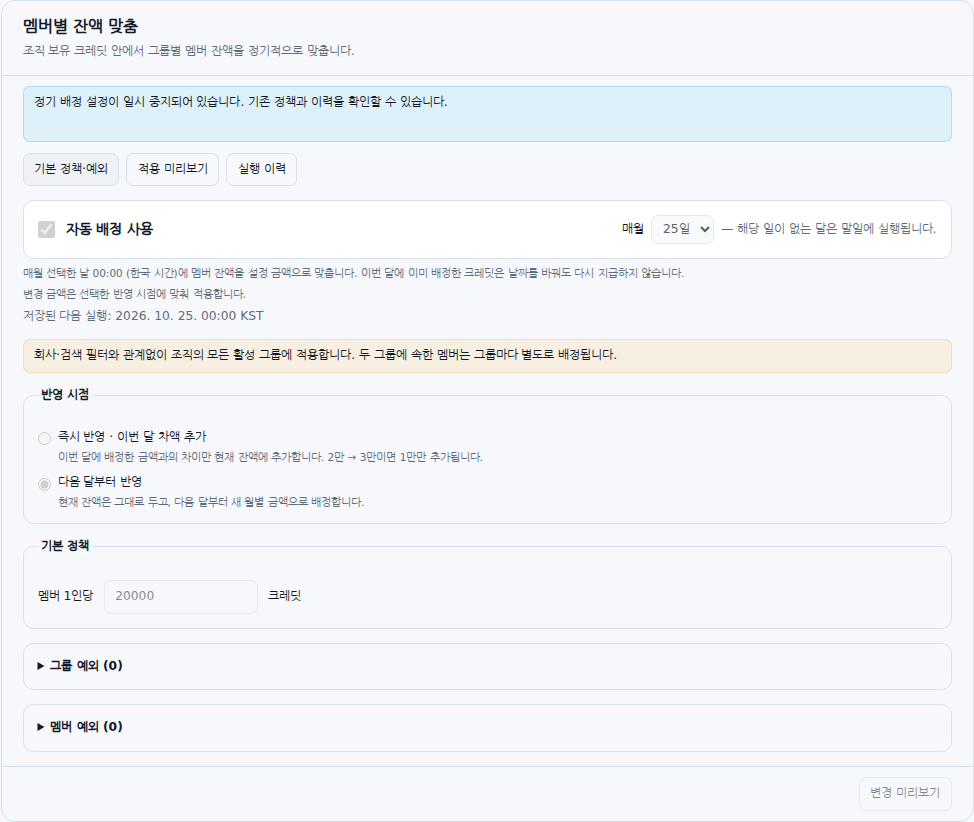
Example screen: the service's recurring allocation settings feature is disabled, so only existing policy and history can be viewed. This differs from turning off automatic allocation within an organization's policy.
Was this answer helpful?