Manage enterprise members and group managers
Find members, update accounts, manage primary and additional memberships, and configure the groups you administer.
Updated: September 2026
Use Enterprise Organization Management > Members to find employees, maintain their accounts, and manage group membership.
Permissions: Organization-wide member management and group manager assignments in this guide require the organization administrator. If you are a group manager, use the When you sign in as a group manager section below. Group management does not grant permission to add or delete members across the organization.
A primary group is a member's main membership, an additional membership lets the member also belong to another group, and the active group is the group currently selected for use. Companies and departments describe the organization chart; an operational group determines credit and model settings. More than one department can share the same operational group.
Version and screenshots: This guide describes v7.1925, checked on September 21, 2026. Screenshots show the Korean interface with the fictional Hanbit Group and sample names, email addresses, and amounts. English labels below describe the corresponding controls; wording and availability depend on your interface language, organization settings, and permissions. Each procedure is a separate example, so people and amounts can differ between screenshots.
Find members and check their memberships
Open: Enterprise Organization Management > top-level Members > inner Members tab.
- Choose All companies or a specific company. Use No active company or department connection to find groups without an active company connection.
- Enter part of a name or email address in Search by name or email.... Clear the search with the input's x button.
- Select the Name, Email, or Primary group column heading to change the sort order.
- Compare Primary group, Additional groups, and Active group. If a member has three or more additional memberships, select +N more to expand them and Collapse to close them.
- Check Active group's spending mode, Group credits remaining, Personal credits remaining, and Number of group models. Scroll horizontally inside the table if those columns are off-screen.
- Select the arrow in Details to expand the primary group's limit, usage, and allowed-model count. Select it again to collapse the details.
- Use the page controls and page-size selector at the bottom. Available page sizes are 10, 20, 50, and 100; the default is 50.
How the company filter works: It uses companies connected to a member's current primary or additional groups. A member with additional memberships can therefore appear under more than one company. Changing the company selection clears the checked member selection.
How to read the values: The active group's spending mode and balances based on the primary membership may refer to different groups. Use Credit usage status for a company and team breakdown. Messages such as Failed to load, Check required, and Feature not enabled do not mean that the balance is zero or the member has no group.
If the list is empty: Clear the search when the message says No members match your search. For No members to display, check the company filter and whether inactive members are hidden. If company connections could not be loaded, select Retry or Refresh.
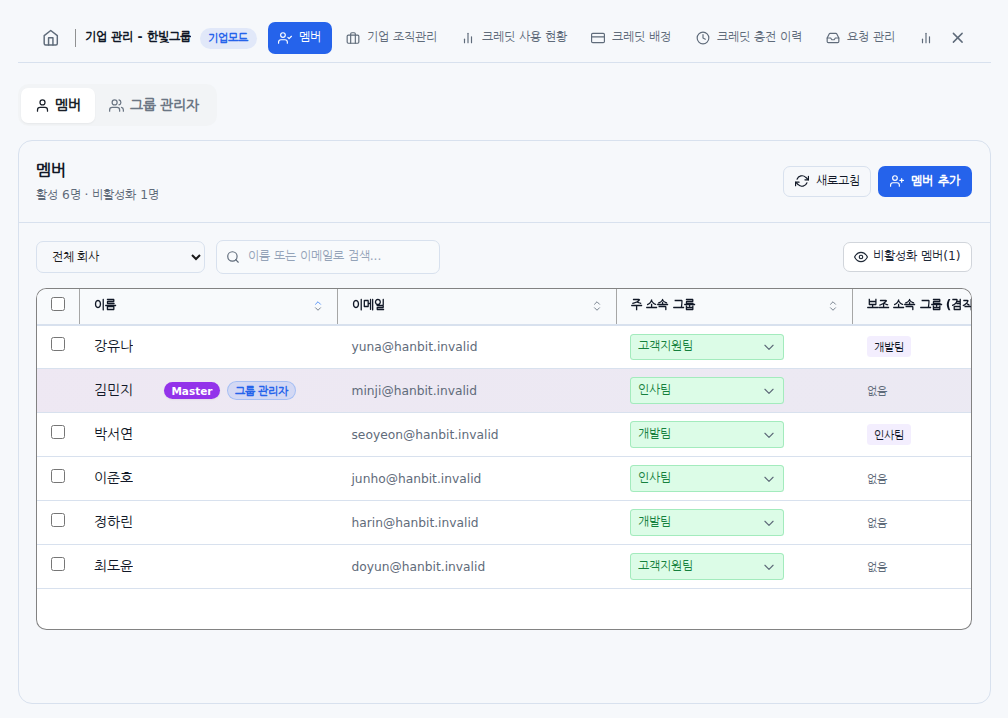
Korean interface with sample data. Narrow the list by company or name, then distinguish primary, additional, and active groups. Scroll right for more columns.
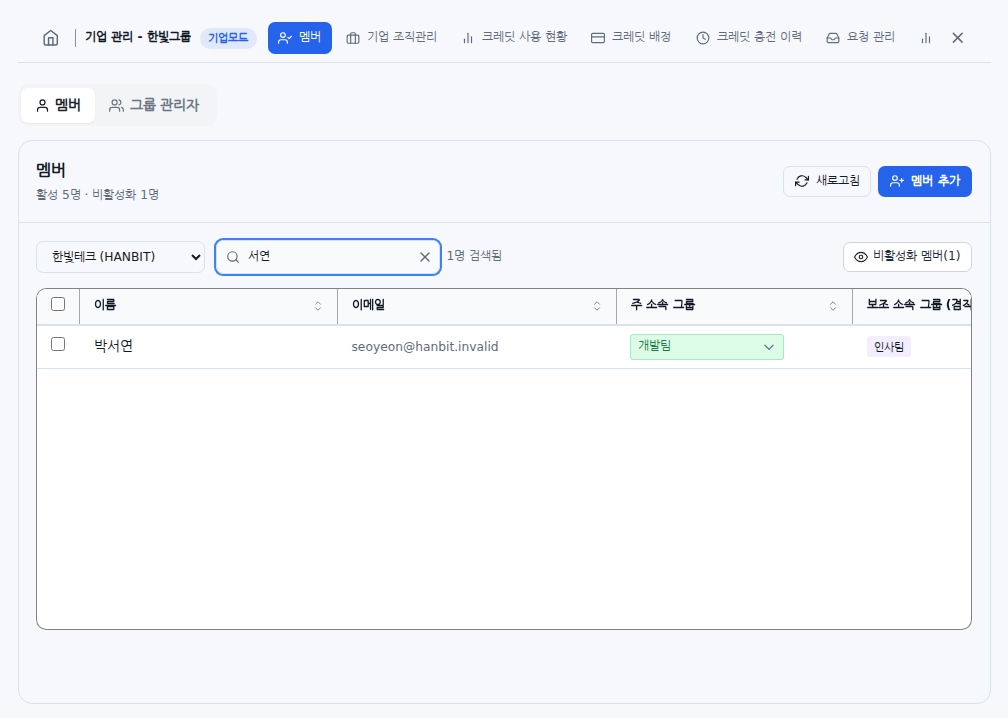
Korean interface with sample data. Check the selected company, matching members, and available actions.
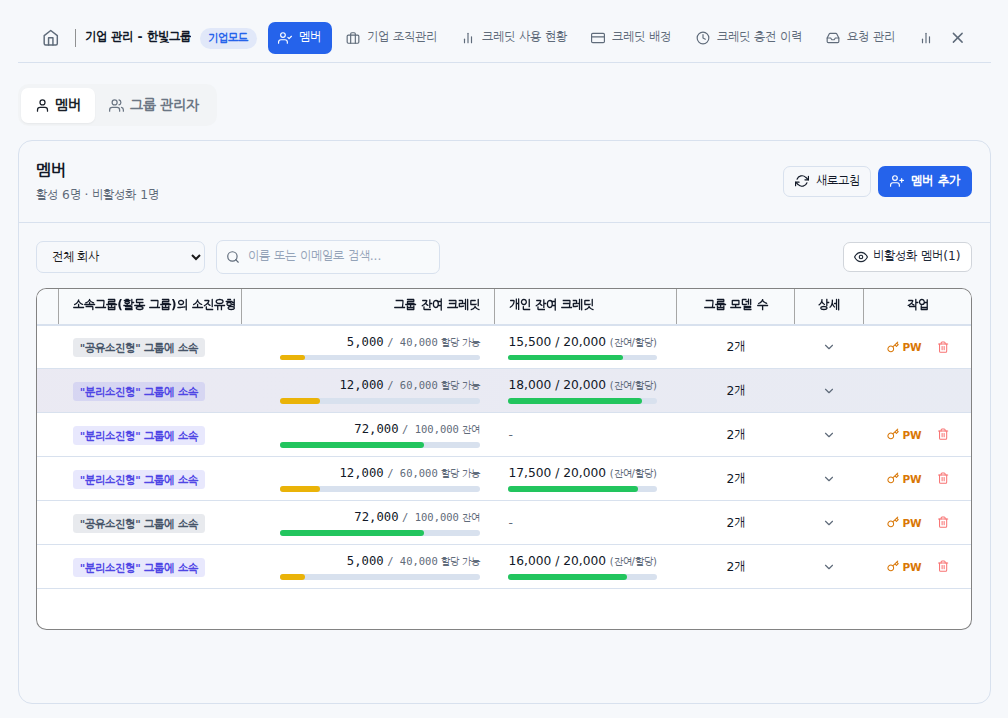
The member table scrolled to the right. This area contains credit, model, detail, and account controls.
Manage names, passwords, and active status
Change a name
- Select the pencil beside the name, labeled Edit name.
- Enter the new name and select the check mark, Save.
- Select x, Cancel, to discard the edit before saving. An empty name cannot be saved.
Reset passwords
- For one member, select PW / Reset password in that row. For several members, check their rows and select Reset passwords above the table.
- Confirm the names and number of selected members.
- Choose whether to Email the temporary password. If this is off, retrieve the password from the results instead of sending an email.
- Select Run reset. A new temporary password is issued, and the member must change it after signing in.
- In Password reset results, check success or failure separately from email delivery. Use the copy icons for email addresses and temporary passwords. Select Download Excel to save successful results.
A password reset can succeed even if the email fails. In that case, check the temporary password and delivery status in the results. Share the temporary password only with that member, and keep it out of shared documents and screenshots.
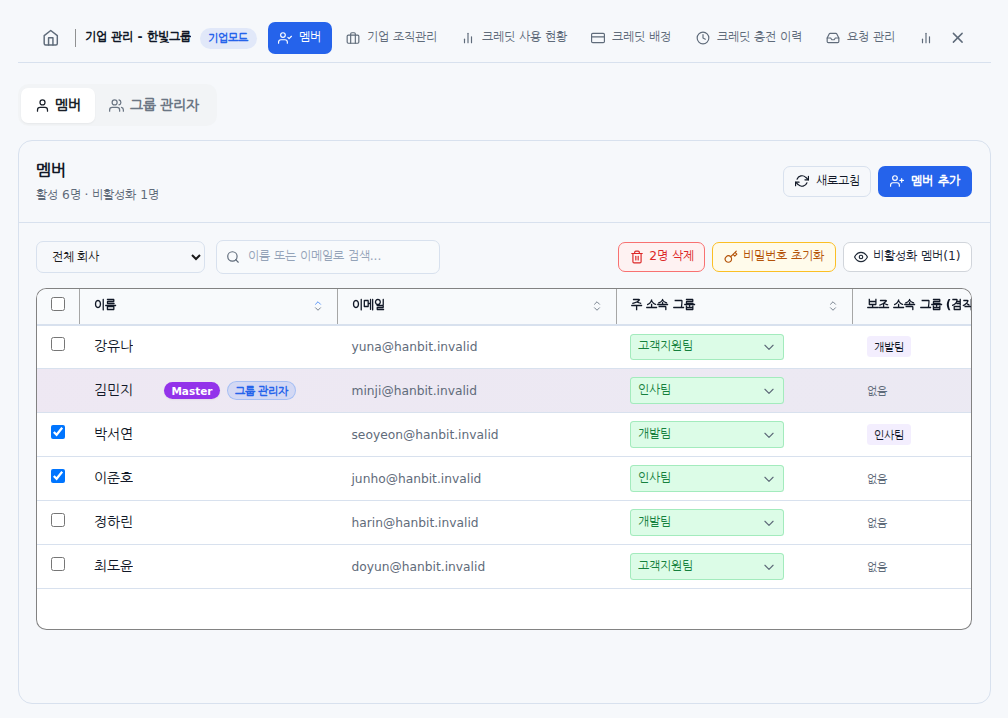
Review the selected count and the confirmation list before running a bulk action.
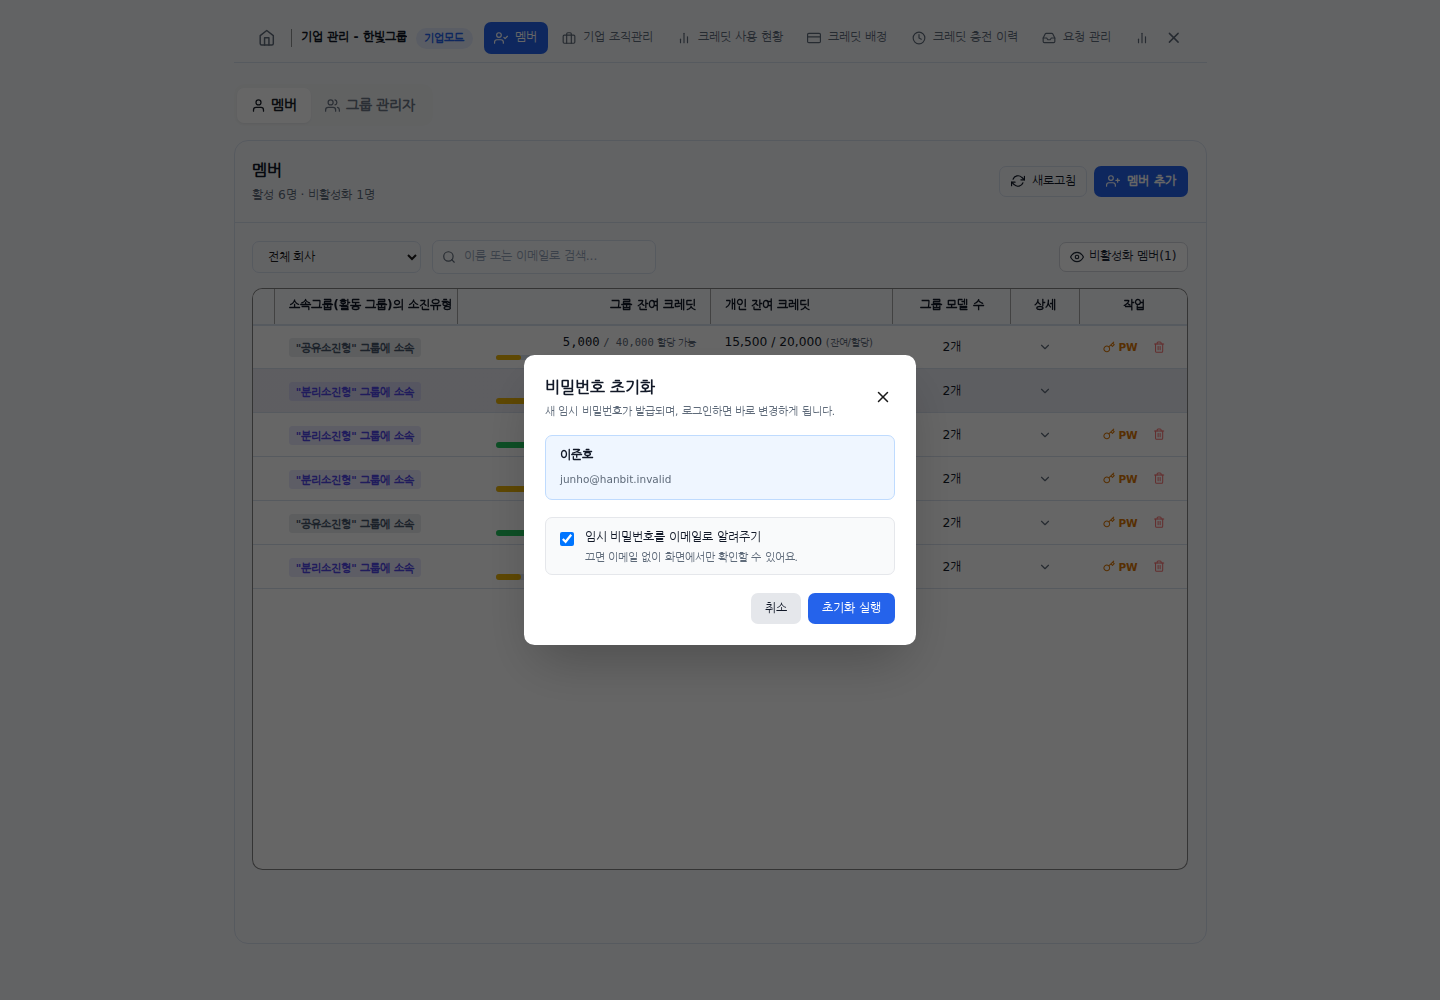
Check the target members and email option. This example shows the confirmation screen before execution.
Deactivate or reactivate members
- Select the trash icon, Deactivate member, on an active member's row and confirm the name. For several members, check their rows and select Delete N members.
- Confirm to deactivate their organization membership. The organization administrator is excluded from deletion targets.
- Inactive members are hidden by default. Select Inactive members (N) to show them and Hide inactive members to hide them again. The control appears when inactive members exist within the selected company scope.
- To restore access, select Reactivate on an inactive row and confirm. Then check the member's current membership and credit allocation. Verify the new balance rather than assuming the previous allocation was restored.
What deletion means here: Usage and membership history are retained. History retained on an inactive row is not a permanent-delete button; the interface explains that permanent deletion is unavailable. A bulk deletion containing inactive members is blocked. Select only active members for that action.
Check bulk selections carefully: Compare Delete N members with the complete list in the confirmation. Select all can include the full company and active-status filtered list, rather than only rows narrowed by the name search. Select people individually for a small operation. Do not assume only the current page is selected.
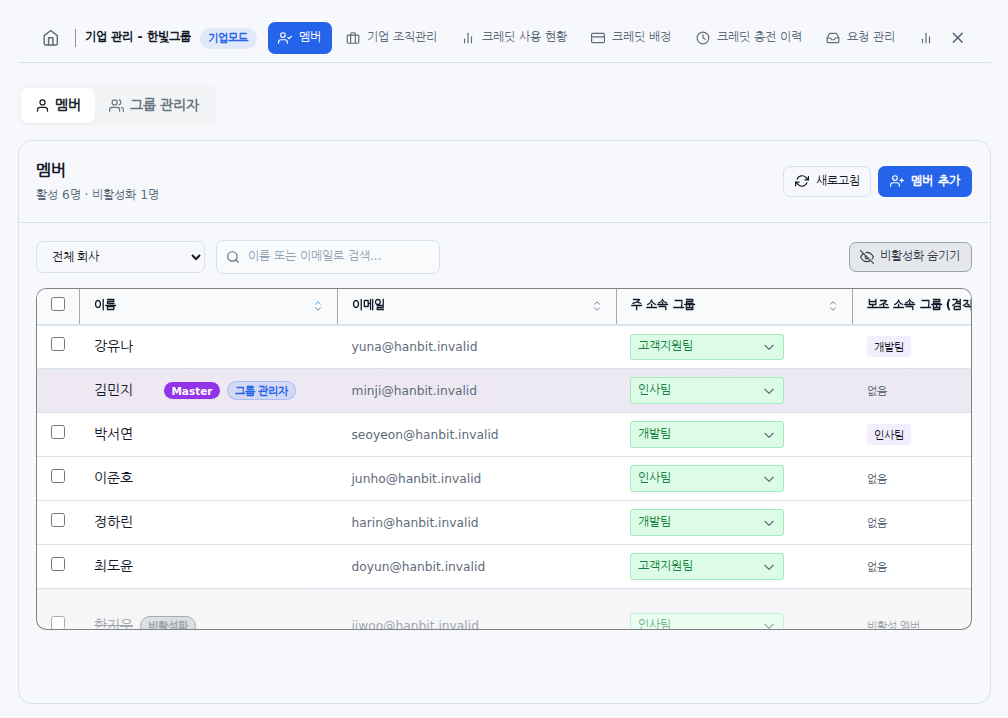
Korean interface with sample data. Use the inactive-member control to review retained accounts and reactivation actions.
Add members and assign departments
Use the bulk entry dialog in Members
- Select Add members to open Add members and assign a department.
- Choose the Department to assign. The dialog shows a notice if it is connected to a credit group.
- Under Members to add: email, name on each line, enter one person per line, for example [email protected], Minji Kim.
- Choose whether to Send an introductory email to new accounts.
- If the button is enabled, select Add members. Correct invalid email lines first.
- Review success and failure counts and any error details. After closing the dialog, select Download addition results on the Members screen to save a CSV containing temporary passwords for successfully created accounts.
Current limitation: For an organization already in operation, this bulk dialog may show an older Administrator editing state notice and prevent saving. Select Go to Enterprise Organization Management, then use the department-specific method below. You do not need to switch to an editing mode or find a Start editing button. If department-specific addition is also unavailable, contact the organization administrator or support.
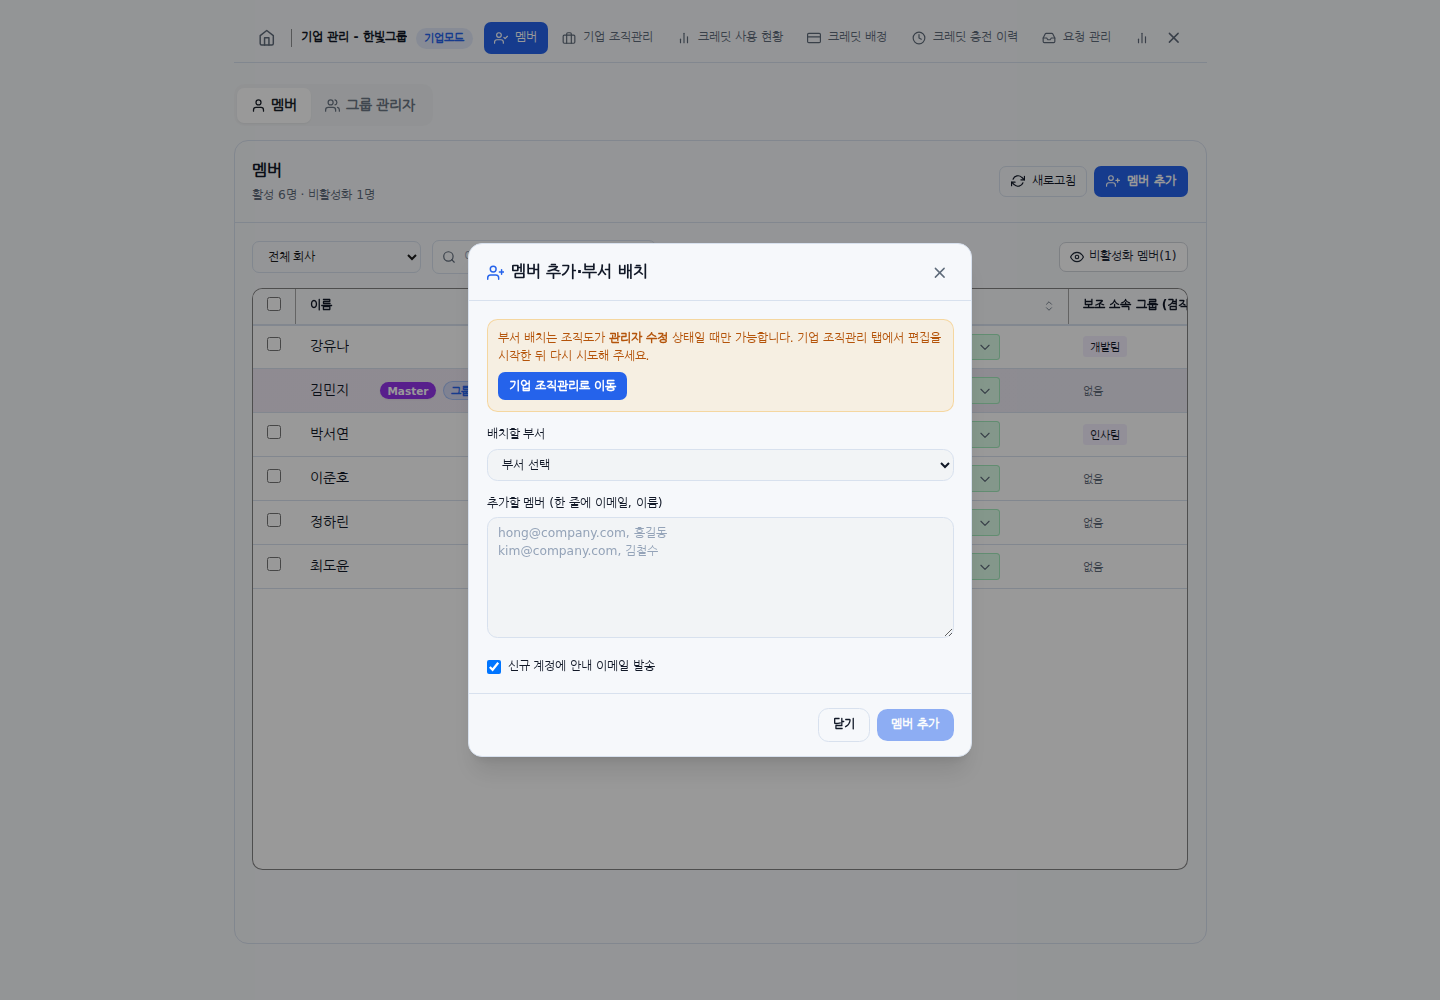
If this restriction appears, select an active department in the organization chart and use its member-addition controls.
Add or reactivate one member from the organization chart
- Open the top-level Enterprise Organization Management tab and select the target department.
- In the right-hand Members tab, find Add or reactivate a member.
- Enter Name and Email. If needed, enter or select Employee number, Rank code, and Position code, which are optional.
- Choose whether to Send an invitation email, then select Add or reactivate.
- Check the department's member list after completion. Review the result if a temporary password is displayed.
This route is available for an organization already in operation. The department must be active and connected to one active operational group. A remaining notice that roster changes run only in a preparation state does not mean you should switch to a separate editing mode. If the button is disabled or a restriction appears, contact the organization administrator or support. Use the next procedure to move a member who is already active.
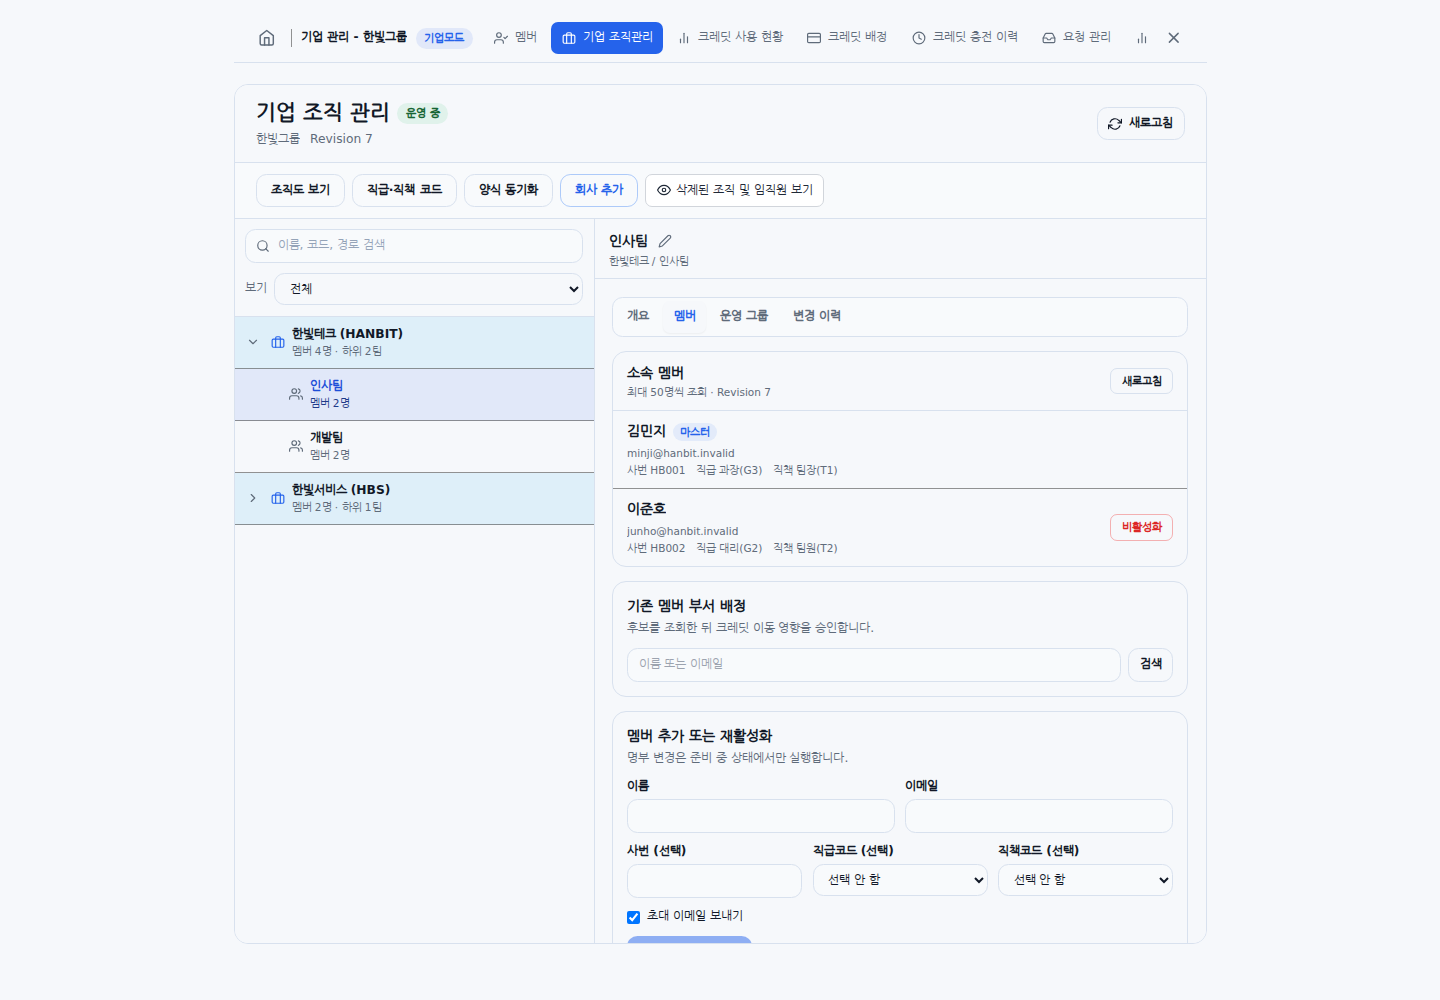
Korean interface with sample data. Confirm the selected department before adding or reactivating a member.
Move an existing member's primary department
- Select the destination department, then open Members > Assign an existing member to this department.
- Search by Name or email and select the person.
- Select Preview assignment impact.
- Review Current department > Destination department, any operational-group change, Recoverable credits, and the Initial limit at the destination.
- Select Approve impact and assign.
Moving groups can change credit allocations. If existing group manager permissions block the move, resolve those permissions first instead of bypassing the restriction. You can also open the chart from a member's Primary group button and select Change department or group in the organization chart.
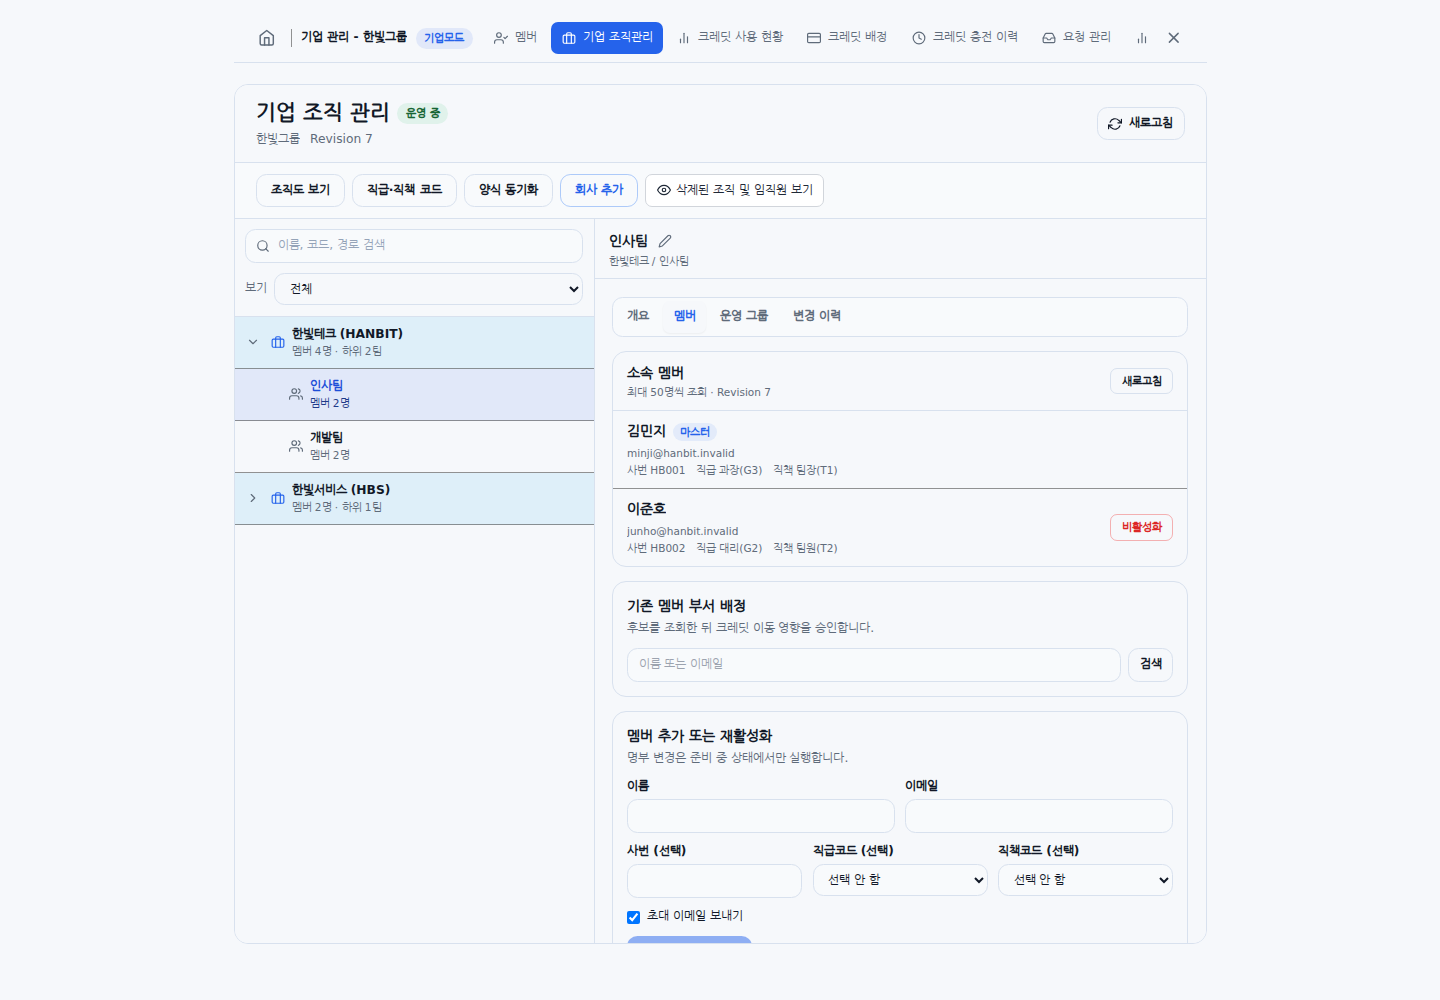
Korean interface with sample data. Check the department and its current members.
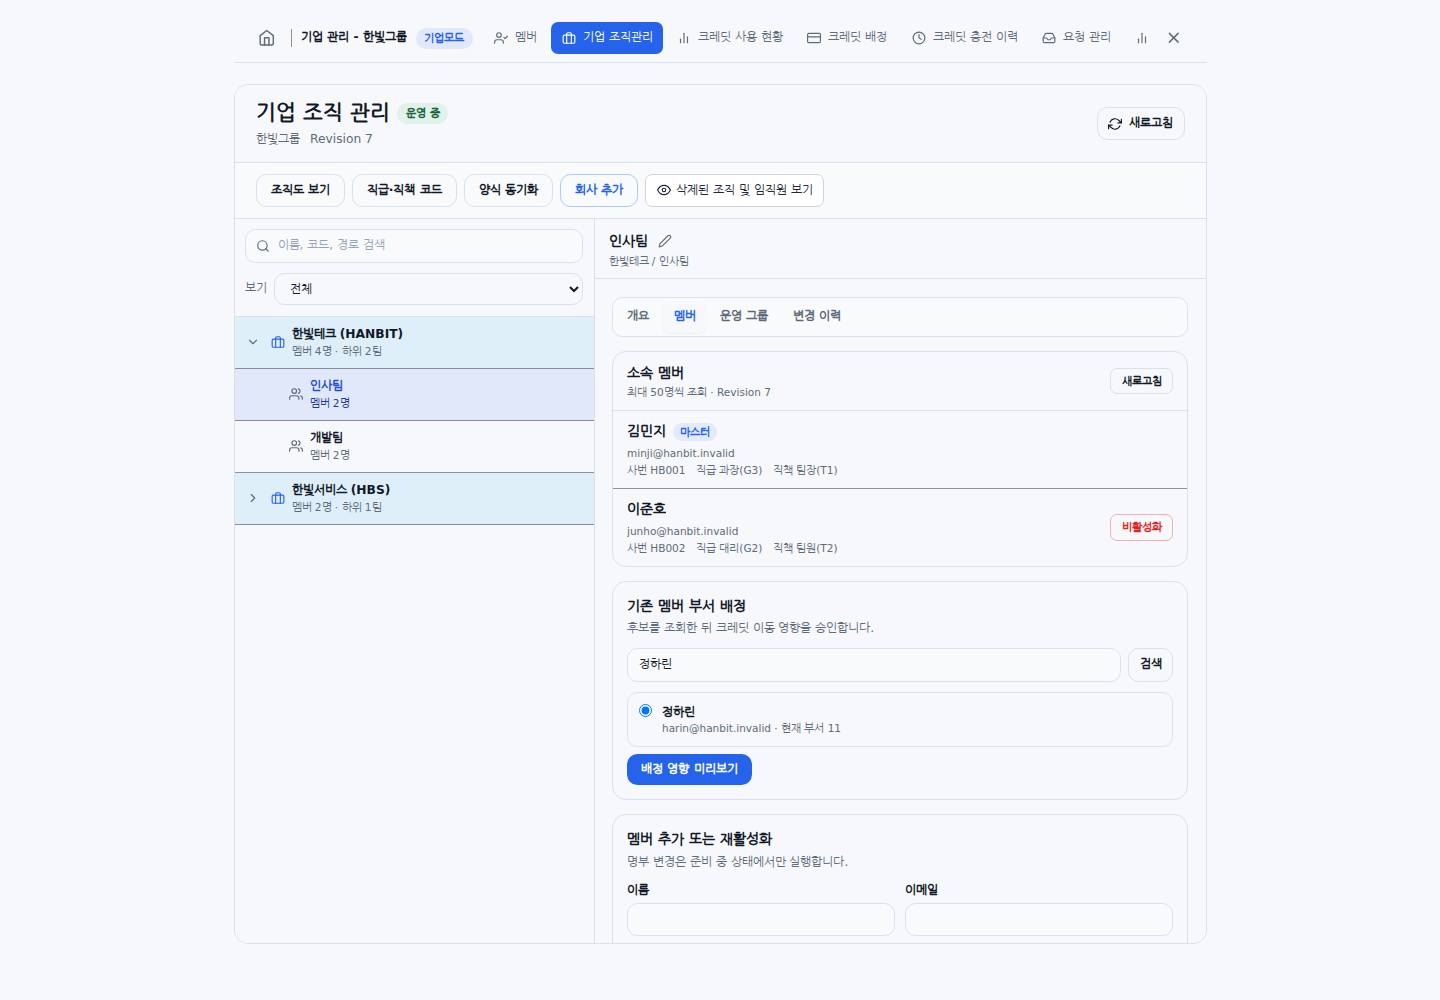
Match the name and email before selecting a person, then review the impact on their primary membership.
Manage additional memberships and group managers
Open: top-level Members > Group managers.
- Choose a company under All companies, or use Search for a group to assign.
- If needed, select Only groups with no managers. Select it again to remove that filter.
- Review Group, Company, Parent organization, Primary manager, Secondary manager, and Manager count. Select column headings to sort.
- Select Manage additional memberships for the target group.
- In Current members, check the Primary membership, Additional membership, and Group manager labels.
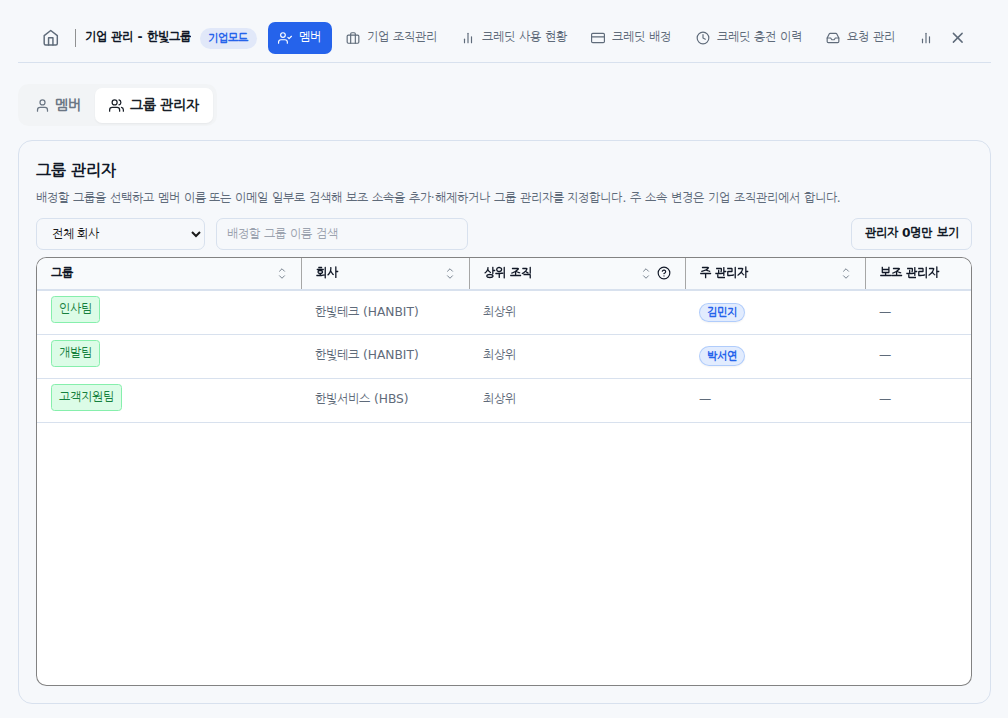
Korean interface with sample data. Find the correct operational group and review its group managers.
Add a membership in another group
- Under Add an additional membership at the bottom of the dialog, enter at least two characters of a name or email and select Search.
- Select Add additional membership beside the correct result. A person already in the group as a primary or additional member cannot be added again.
- The primary membership stays unchanged, and an additional membership is created in the selected group. Check the updated list.
- The first 20 matching people are displayed. Refine the search if the person is not shown.
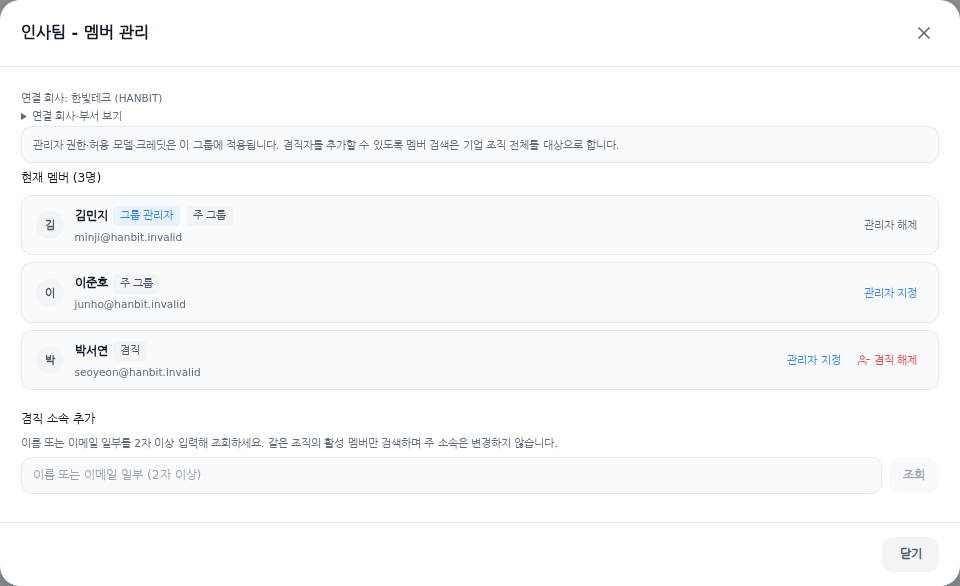
Korean interface with sample data. Review current membership and group manager labels before making a change.
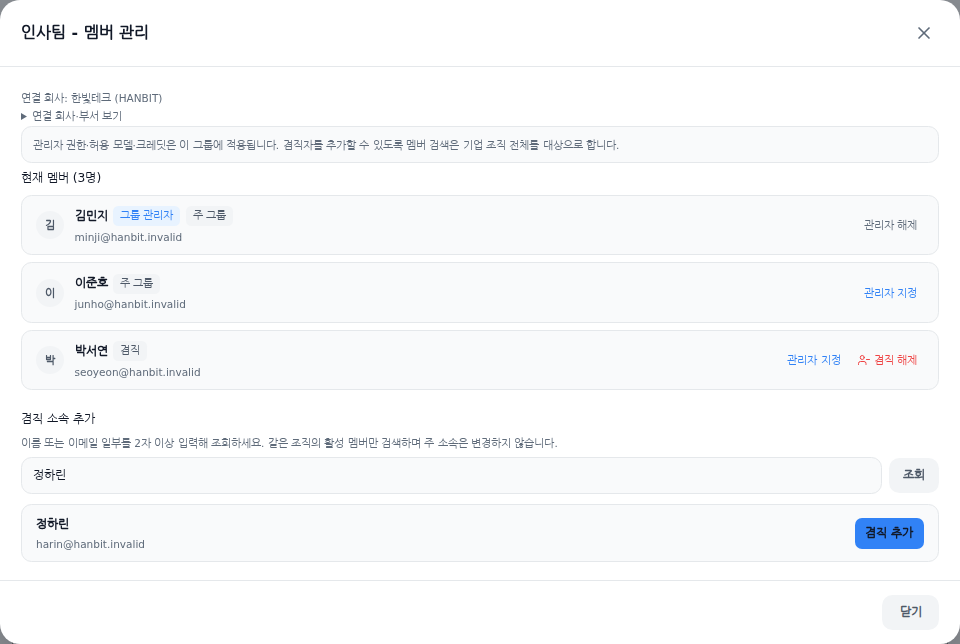
Korean interface with sample data. Verify the person's email and destination group before adding the membership.
Remove an additional membership or change group manager status
- Remove additional membership removes only that secondary membership. It does not change the primary department.
- Assign group manager grants a member of this group permission to manage group properties, allowed models, and credits. It does not grant permission to create or delete organization members. The action runs when selected, so verify the person first.
- Remove group manager revokes that group's manager permissions. It does not remove the person's membership.
- In enterprise mode, this dialog does not change or remove the primary membership. Use department assignment in Enterprise Organization Management.
If the feature is missing: You need organization administrator permission, the additional-membership feature enabled, and the required organization data ready. If Additional-membership management is not enabled yet or a data-conversion notice appears, select Check again. If it remains unavailable, ask the organization administrator or support to check activation.
If the group list is empty: For No active groups to manage or No groups match your search, check the company filter, search, and no-managers filter. The table lists active operational groups.
When you sign in as a group manager
Open: Enterprise Organization Management > top-level Members. You see the rosters and settings of groups assigned to you. Ask the organization administrator to add or delete members across the organization or move people to another department.
- Under Managed groups, select the group to configure. If you manage several groups, check the target before editing.
- In Group name roster (N members), review names, emails, Primary group / Additional membership, and each member's usage.
- Use the functions available under Group settings. If protection or allowed-model controls are missing, check your permission for that operation.
Change protection settings
Turn Always detect sensitive information and Always block harmful content on or off. Changing either checkbox immediately requests a save. There is no separate Save button or final confirmation, so check the group first. Wait for the success message, verify the checkbox state, and allow an in-progress change to finish before making another one.
The group name and description cannot be edited on this screen. Ask the organization administrator to change the name or membership.
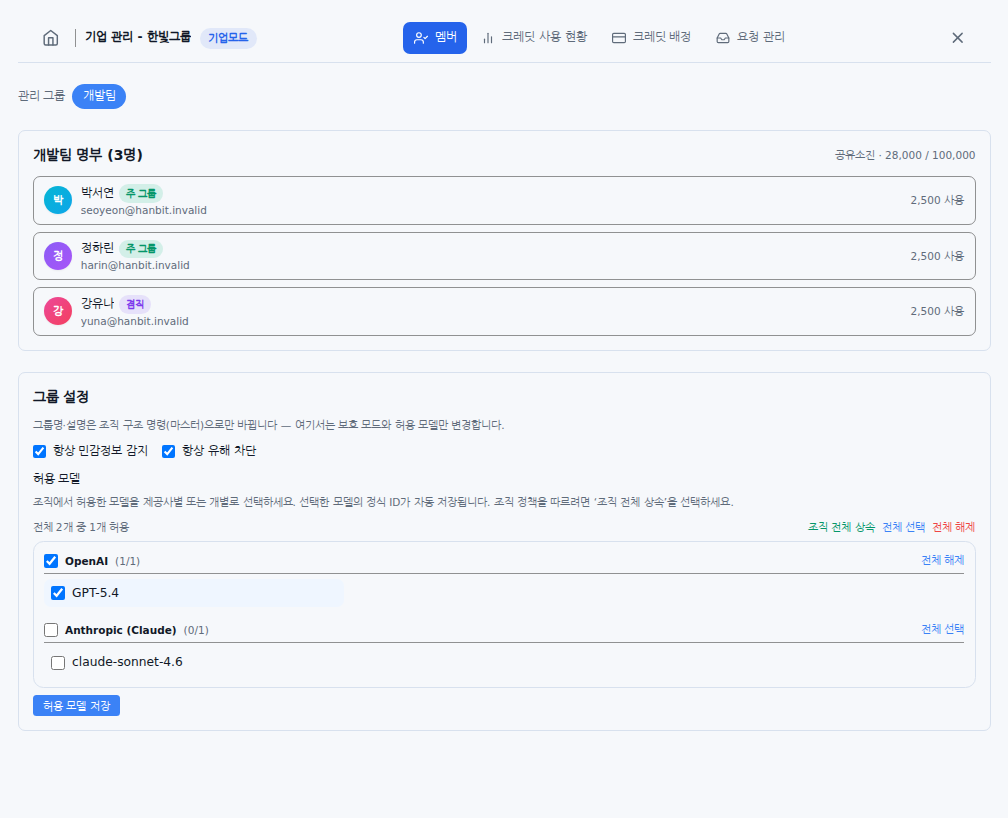
The group manager view. Protection switches save immediately; model selection requires a separate save.
Choose allowed models
- In Allowed models, review the models available to the organization and the selected count.
- Select an individual model or a provider's models. Use Select all / Clear all for the full list, or the equivalent controls inside one provider.
- To follow the organization's settings, select Inherit organization settings. The current inheritance state is labeled Inheriting organization settings.
- Select Save allowed models. Changing selections or choosing inheritance alone does not save the change. Save before switching groups.
- After the success message, verify the selection. In explicit-selection mode, an empty selection cannot be saved: select at least one model or choose organization inheritance.
You cannot add a model that the organization does not allow. If No models are allowed for this organization appears, ask the organization administrator to review the organization settings. If the model list fails to load, refresh instead of saving.
Use the top-level Credit allocation tab for credit changes and Request Management for member requests. Changing models on the Members screen does not issue credits or change a monthly allocation policy.
Was this answer helpful?