Manage companies, departments, and the organization chart
Create and organize companies and departments, connect operational groups, delegate department administration, and synchronize organization workbooks.
Updated: September 2026
Use Enterprise Organization Management to maintain companies, departments, operational-group connections, and the organization chart.
Permissions: This menu is available to the current organization's active organization administrator. The organization-editing feature must also be enabled before changes can be made. Department manager or group manager permission alone does not allow editing the entire chart.
Companies and departments describe your organizational structure. Operational groups control credits and allowed models; several departments can share a group. Creating a department does not automatically allocate credits.
Version and screenshots: This guide describes v7.1925, checked on September 21, 2026. Screenshots show the Korean interface with the fictional Hanbit Group and sample data. English labels below describe the corresponding controls. Availability depends on organization settings and your permissions. The examples are independent and may show different people or amounts.
Manage companies and departments
Open: the top-level Enterprise Organization Management tab. Select a company or department on the left to open its details on the right. Departments usually open on Members; companies open on Overview. On narrow screens, use Back to organization tree to return to the left-hand list.
Find organizations and show hidden items
- Use Search by name, code, or path. If member search results appear, you can navigate to that member's department.
- In View, choose All, Active, No group connection, or No members. Inactive is also available when inactive items are shown.
- Use company and department arrows to expand or collapse children. Company-level nodes initially start collapsed.
- Select Show deleted organizations and employees to include inactive organizations and people. Select Hide deleted organizations and employees to hide them again. This control does not permanently delete or restore data.
- Select Refresh to load current information. A Not up to date notice can restrict saving.
- If no organization is registered, start with Add company. If there are no active organizations, first check Show deleted organizations and employees.
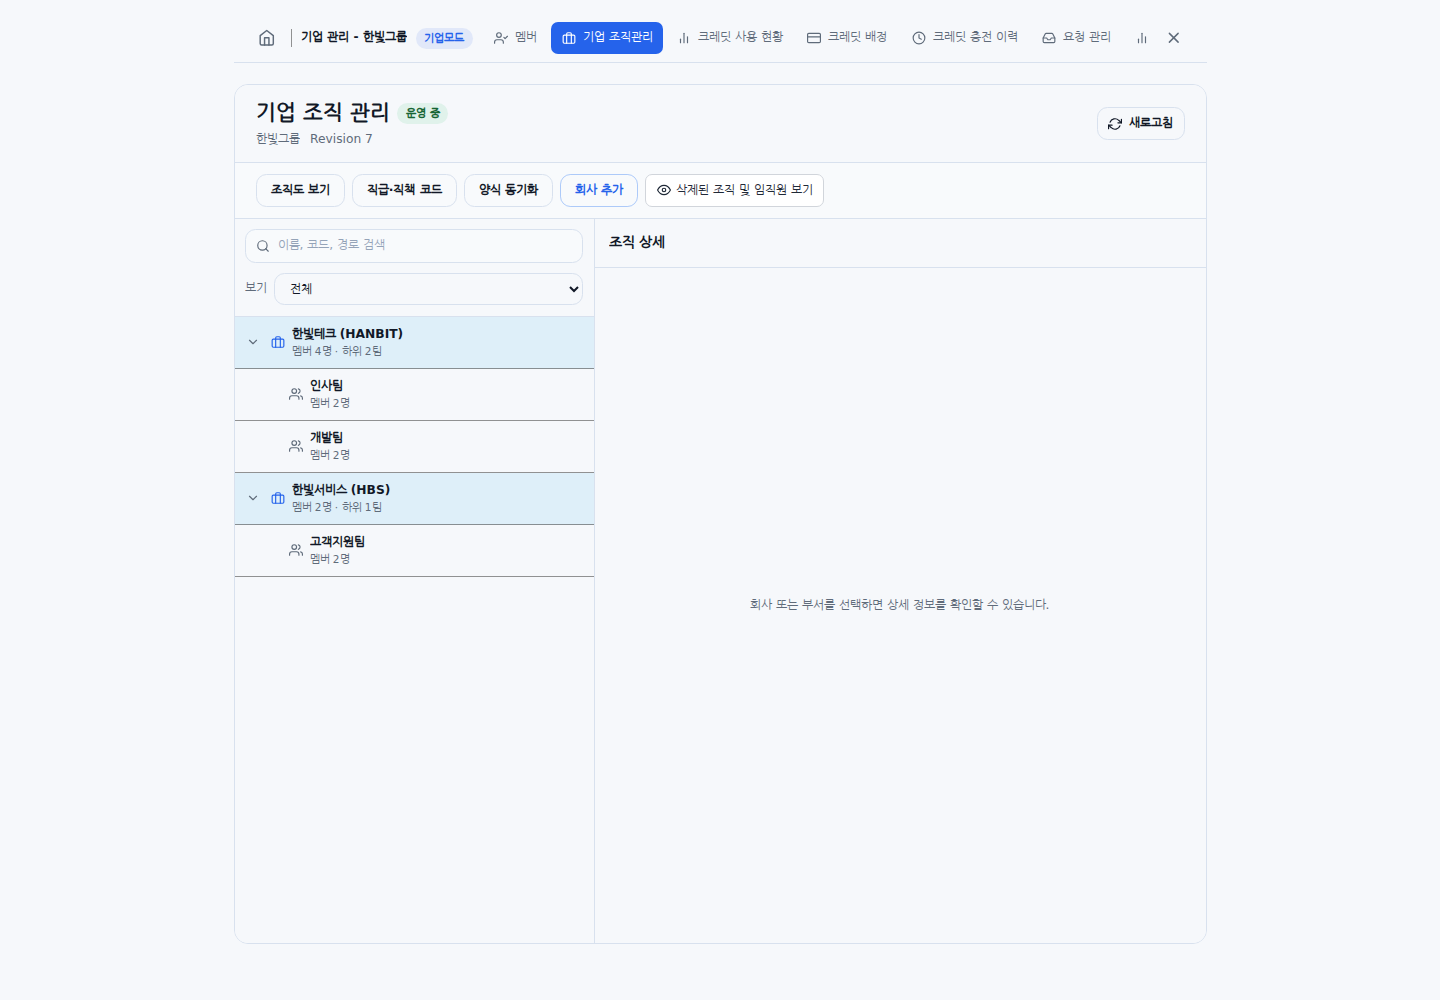
Korean interface with sample data. Select a company or department to open its details.
Add a company or department
- For a top-level company, select Add company, enter Code, Name, and Sort position, then select Save.
- For a subsidiary company, select its parent company, then Overview > Add child company. Enter the same fields and select Save.
- For a department, select its company or parent department, then Overview > Add child department. Enter Code, Name, and Sort position, then select Save.
- Check the new item's position in the left-hand tree. Also check its Operational group connection: creating a department does not itself allocate group credits.
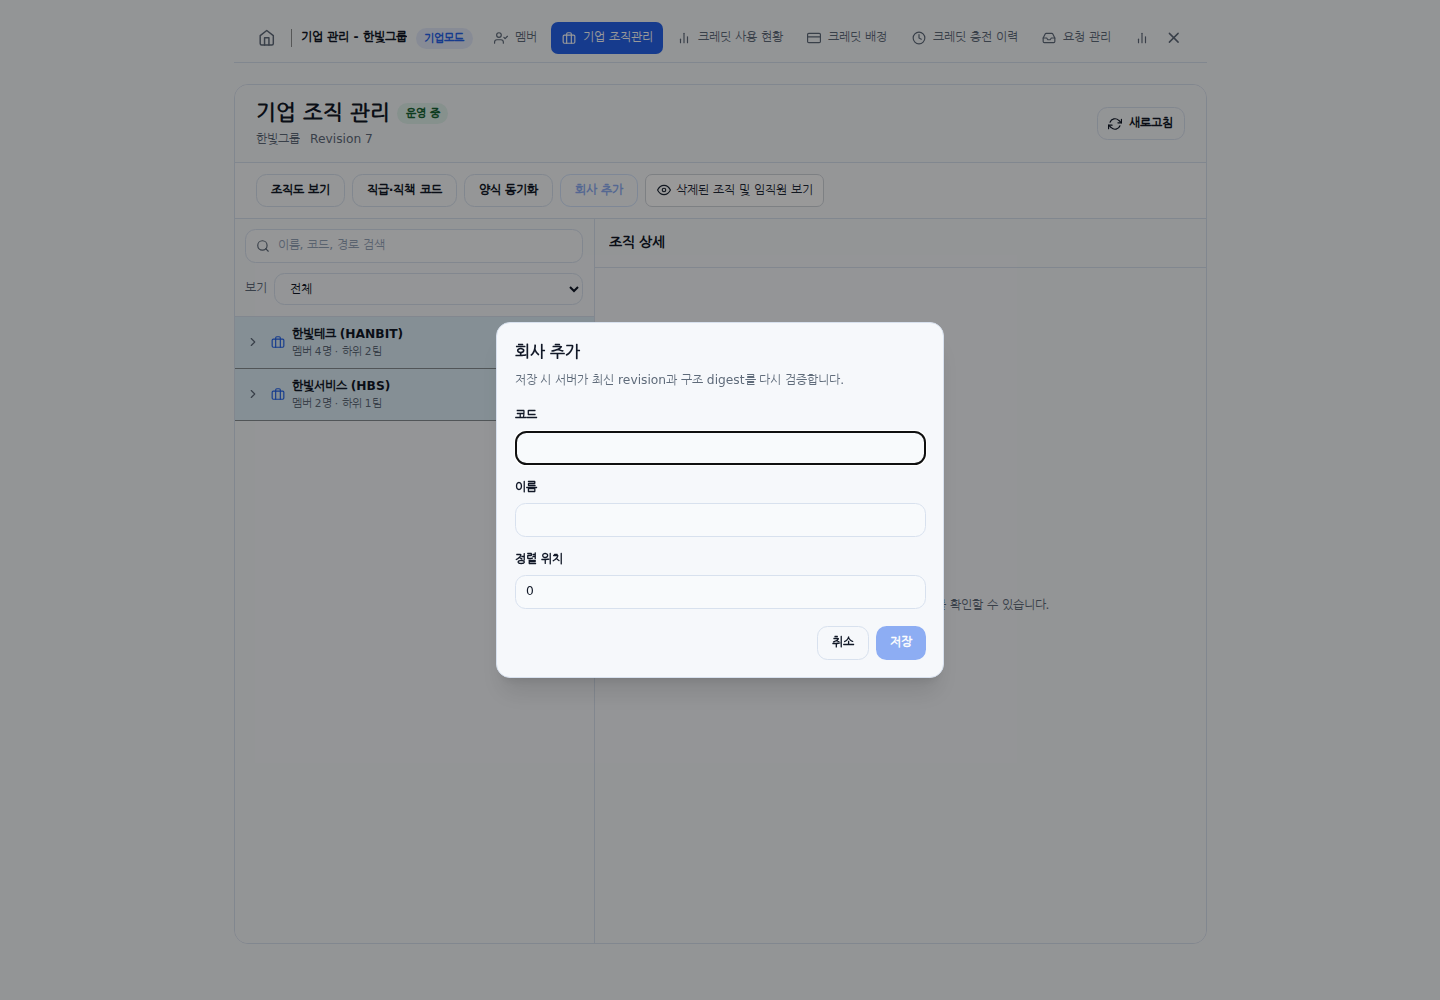
Korean interface with sample data. Check the parent location, code, name, and sort position before saving.
Change a name, parent, or sort order
| Goal | Steps | What to check |
|---|---|---|
| Rename a company or department | Select the item > Rename or the pencil beside its name > New name > Save | The selected item is renamed. Rename is also available in the right-click menu. |
| Move a company | Select the company > Overview > Change parent organization > Parent company ID, Sort position > Save | An empty parent ID moves it to the top level. Enter the company ID, not its name. Ask support for the ID before changing it if you do not know it. |
| Move a department | Select the department > Overview > Change parent organization > Destination path, Sort position > Preview impact > Confirm and move | Review effects on child departments, members, group connections, and any code conflict in the destination company. |
| Change display order | Select the company or department > Overview > Change order > Sort position > Save | The display order changes within the same parent. |
Organizations already in operation use these save and preview steps. There is no separate organization-chart editing-mode switch or final Apply changes stage.
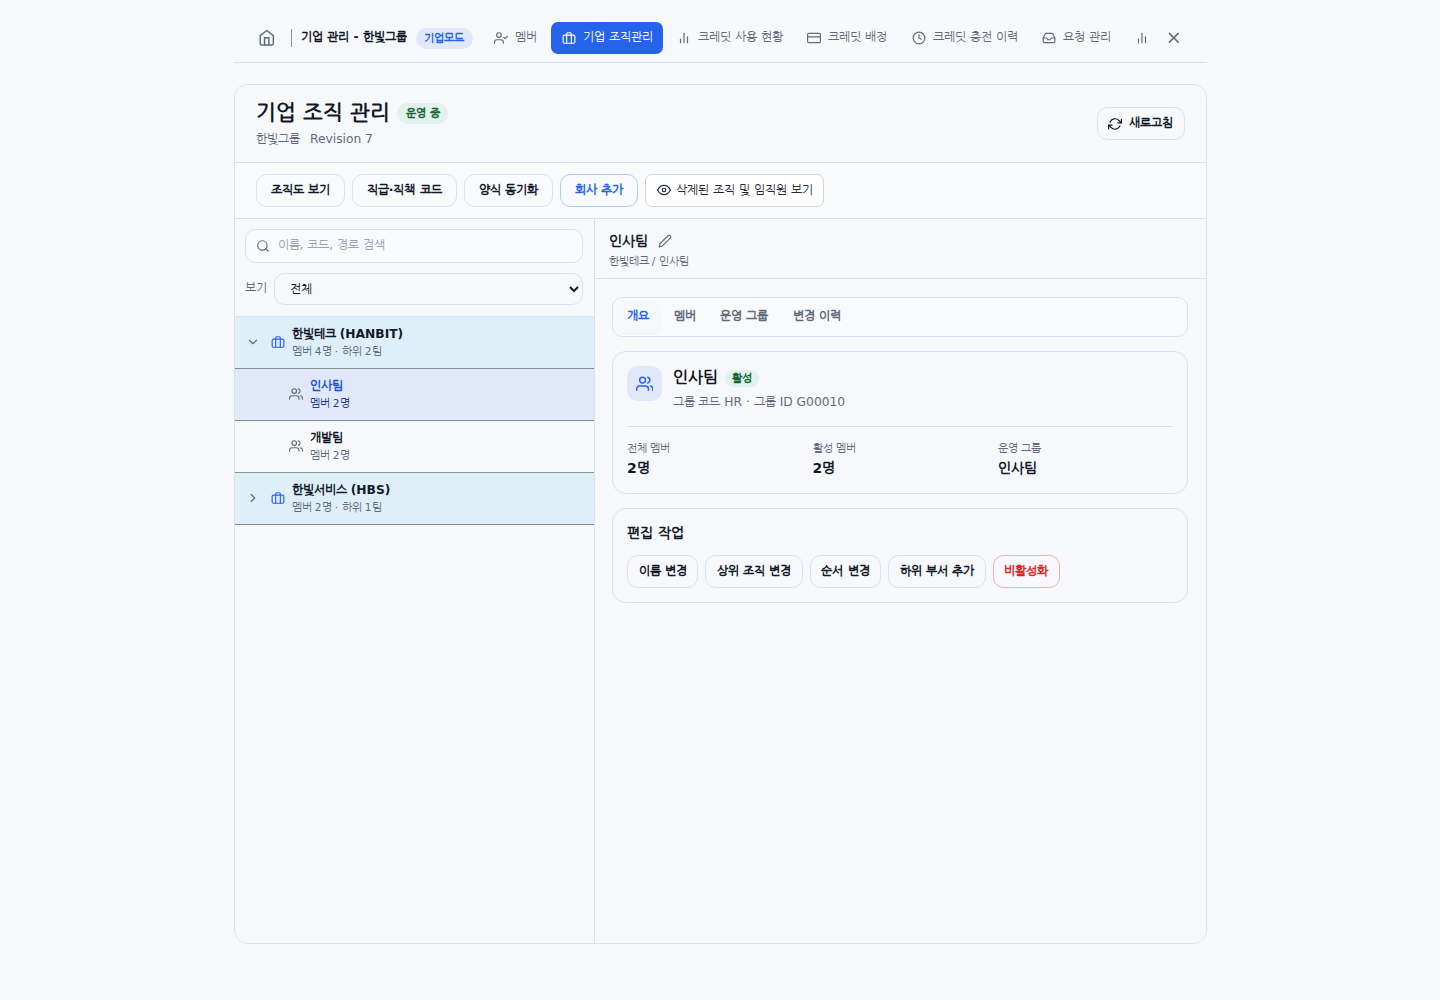
Korean interface with sample data. Confirm which department is selected before changing its name or location.
Deactivate or reactivate an organization
- Select the item, then Overview > Deactivate, or choose Deactivate for that organization from the right-click menu.
- Review notices about remaining child organizations, members, and operational-group connections.
- Enter the exact name requested for confirmation and select Deactivate. Basic deactivation does not automatically move members or remove connections.
- To include child organizations, use Deactivate including descendants. Check the company and department counts and the connections to be removed, then select Run deactivation. Move or deactivate remaining members first.
- To use an inactive organization again, select Show deleted organizations and employees, right-click the inactive item, and select Reactivate. Data and history are retained, but previous group connections, member assignments, and credits may not all be restored automatically. Recheck each one.
An error after partial completion may display a completed-item count. Do not assume that an error means nothing changed; refresh the chart to see the current result.
Operational groups, department managers, and history
Connect an operational group
- Select a department and open Operational group.
- Choose an active group under Operational group to connect, then select Preview binding impact.
- Review the Impact to approve, including any membership moves, then select Approve impact and save.
- To remove a connection, select Remove binding and review the proposed impact and any blocking conditions.
Binding means the connection between a department and an operational group. A department with members cannot have its connection removed arbitrarily. Resolve any listed blockers first.
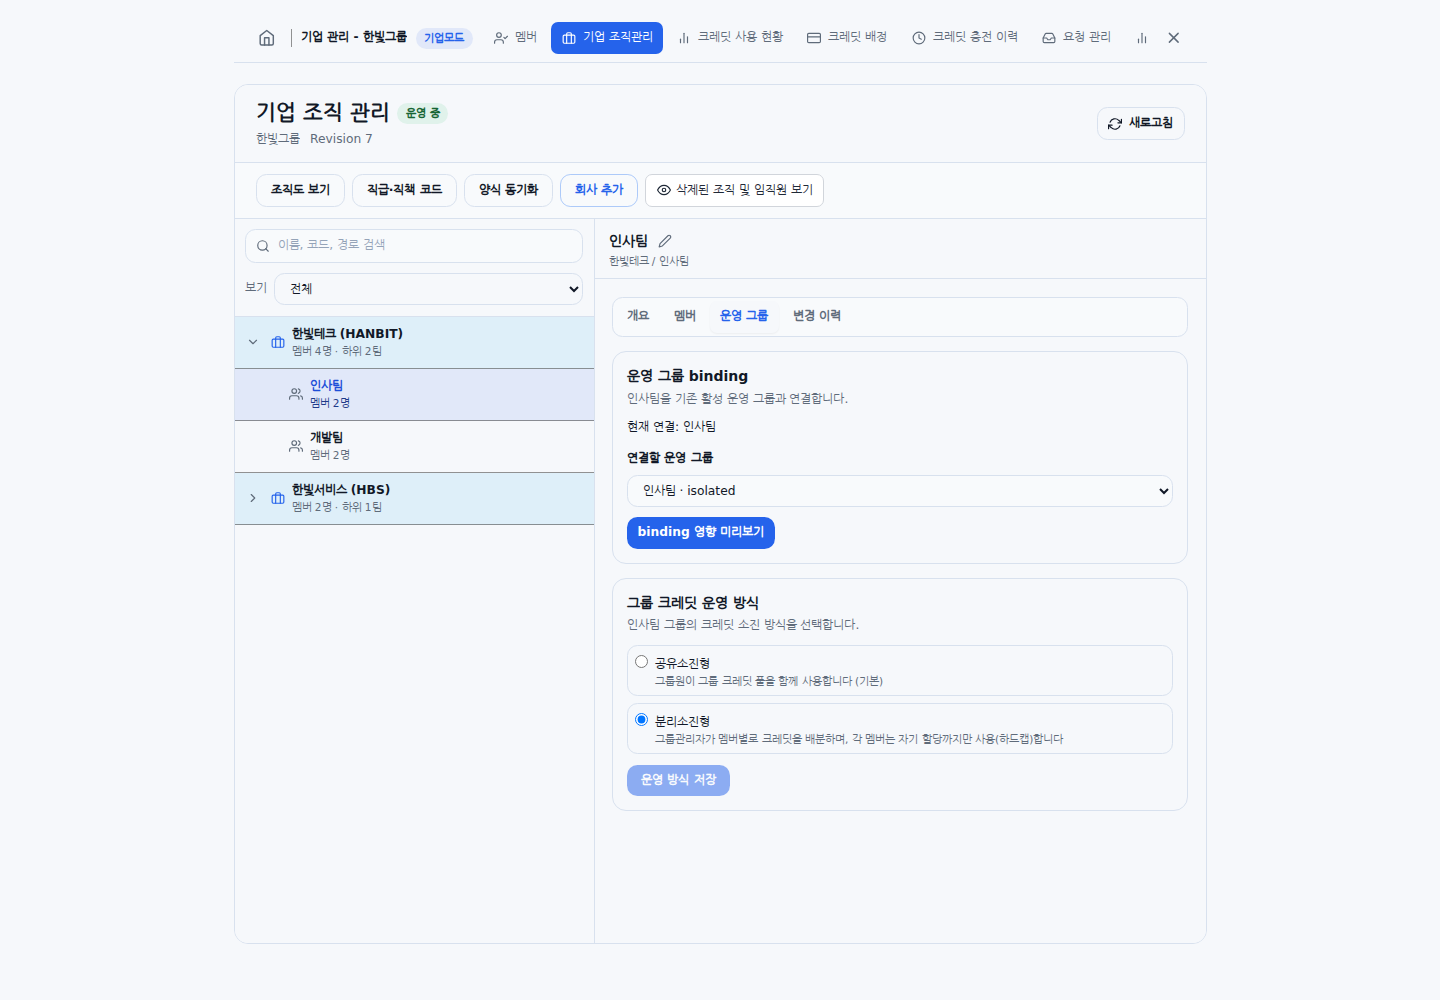
Korean interface with sample data. Review the group connection and the scope of any credit-policy change.
Shared and isolated spending modes
When Group credit spending mode is available for the connected group, choose Shared or Isolated and select Save spending mode.
Changing to isolated spending resets member allocations to zero. Changing to shared spending removes individual allocations so members use the group's balance together. Switching back does not restore previous personal allocations. After a change, use Credit allocation to assign the credits members need.
Assign a department manager
This area is available to the organization administrator when the relevant feature is enabled.
- Select the department and choose Assign under Department managers.
- Select a person under Assignment target: primary members of this department.
- Choose Based on primary assignment or Manual assignment, whether to Include child departments, and which operations to allow.
- Select Preview scope. Review the number of departments, groups that can be changed, and shared groups that cannot be changed under this scope.
- Select Confirm assignment. Check Effective / Not effective and the reason in the manager list.
- To revoke access, select Revoke, enter a Revocation reason, and select Confirm revocation. This does not delete the person's organization membership.
Available operations are Manage allowed models within the organization's permitted range, Adjust isolated allocations, Request shared-group credits, and Review personal allocation requests. Leaving all operation permissions unchecked allows a read-only role. Organization changes, member deactivation, or membership moves can affect whether the grant remains effective.
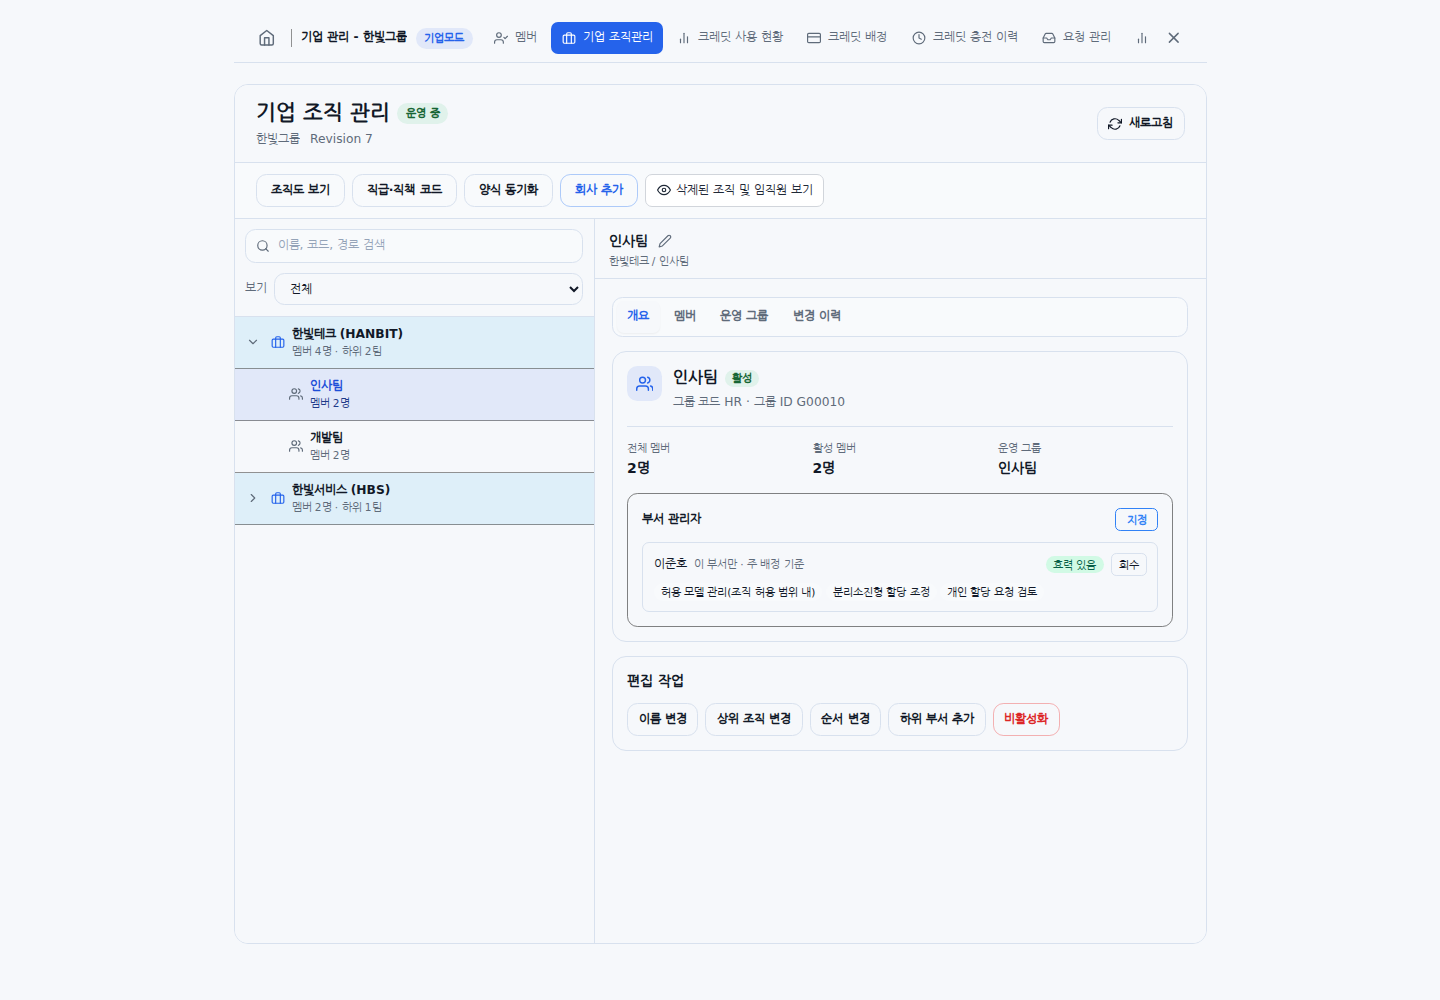
Korean interface with sample data. Grant only the operations the department manager needs.
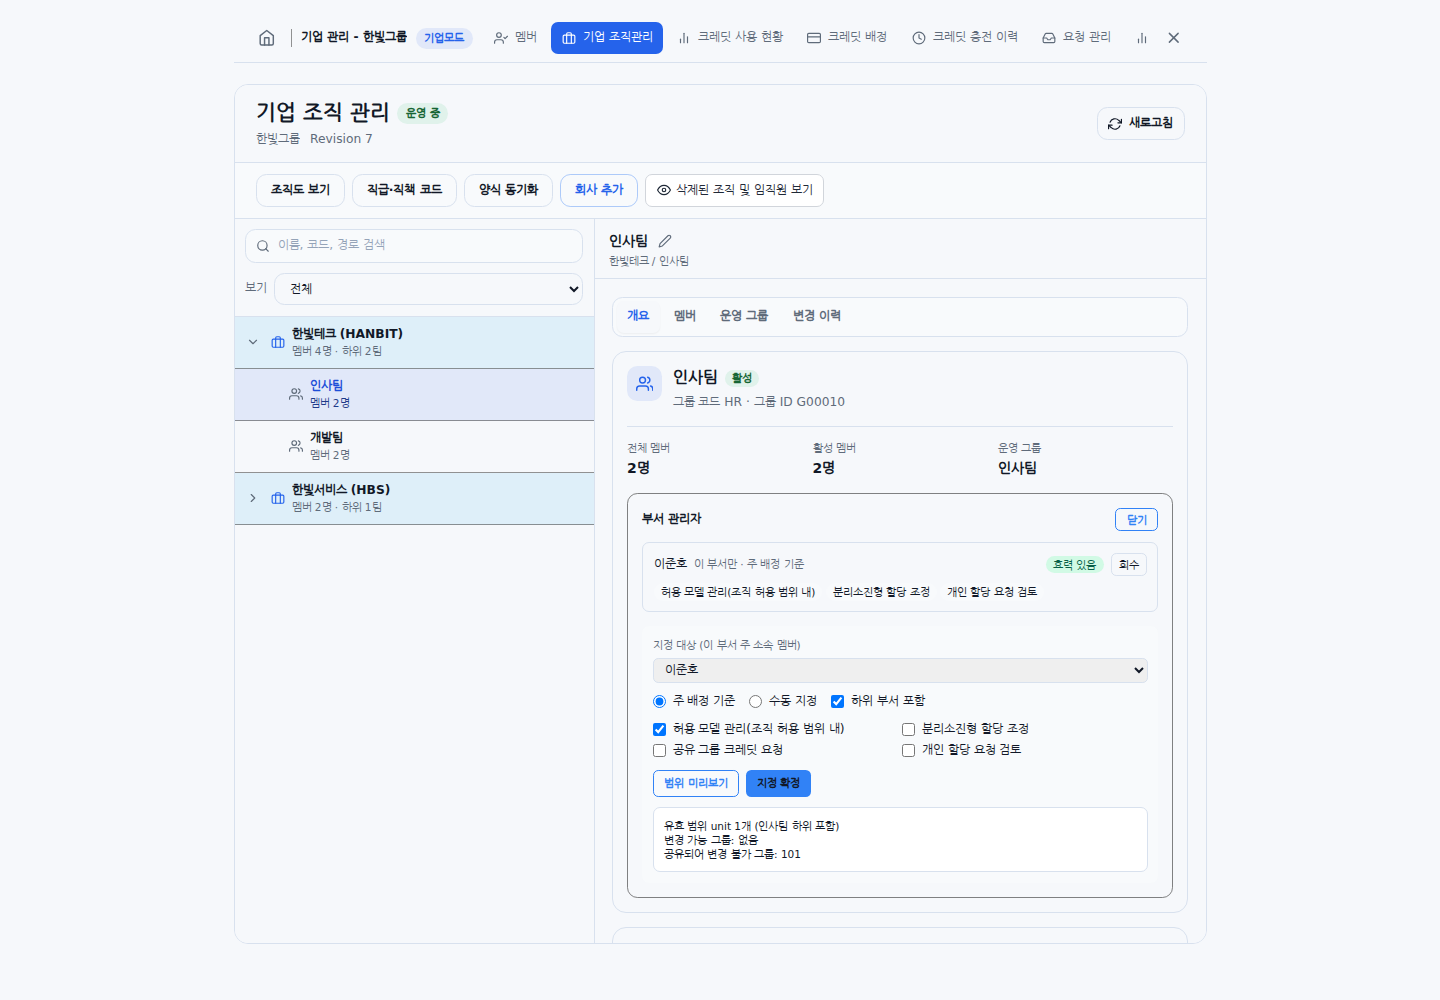
Review editable groups and any shared groups excluded from the proposed scope before confirming.
Review change history and resolve conflicts
- Open Change history to see who acted, what changed, and when. Use Refresh or Load more history. No changes to display means there are no entries to show.
- History is for review; there is no button that automatically restores an earlier version.
- If another administrator changes the same data first, Conflict with the latest changes may appear. Compare Before, Current server state, and My draft, then select Review against the current state. Use Close draft if the change is no longer needed.
- If a server response could not be confirmed, use Check the same request. Do not repeatedly create new requests to save the same change.
- Check organization status is a recovery tool for connections and memberships remaining in the preparation state. When needed, use Check the latest impact > Confirm and apply. It is not the normal way to start editing.
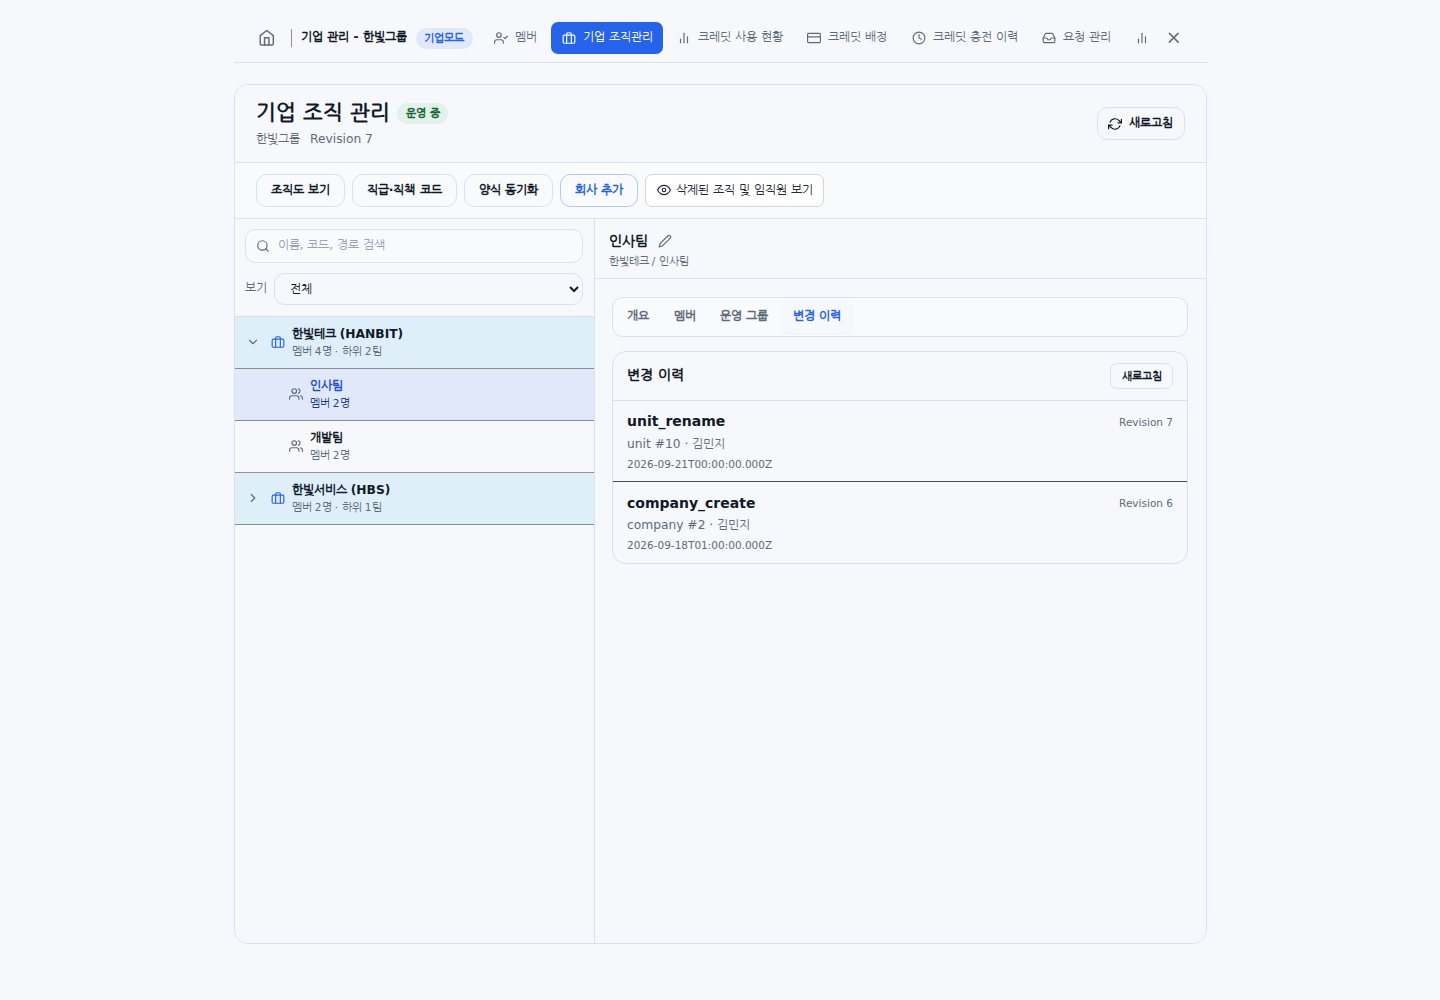
Korean interface with sample data. History records the actor, operation, and time; it is not an automatic rollback tool.
Organization-chart images and Excel templates
Save the organization chart as an image
- Select View organization chart.
- Select an organization to center it and expand its children. Select it again to collapse them.
- Use Zoom in, Zoom out, and Fit all, and drag the canvas to reposition the view.
- Select Save as PNG. The filename uses the organization name followed by the organization-chart label and the .png extension.
- Use Refresh to reload, or Close to return to the management screen. The chart is a viewer; dragging the canvas does not move departments in the organization structure.
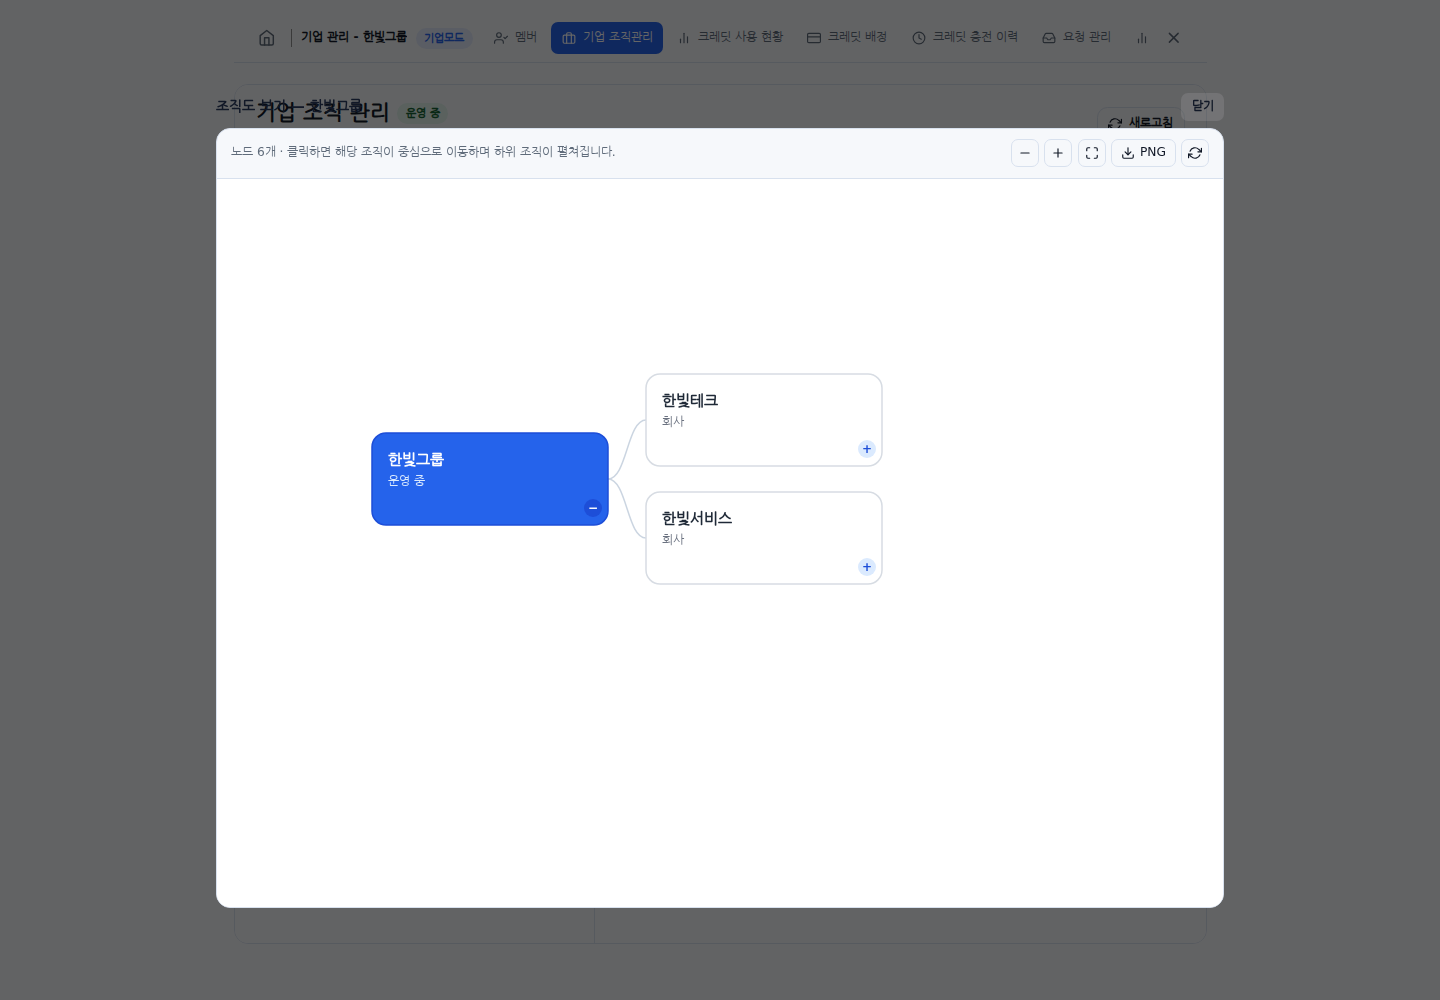
Korean interface with sample data. Adjust the chart view before saving an image.
Synchronize an organization workbook
- Select Template synchronization > Download blank template. If you already have an updated copy, prepare that file instead.
- Complete the Organization information and Personnel information sheets. Remove the sample SAMPLE and example.com rows. Use the provided template rather than an arbitrary spreadsheet format.
- Select Click here to choose the updated xlsx file and choose the file.
- Review blockers and warnings under Initial validation results. Fix blocking issues and upload again. Use Copy validation results to share the findings.
- Review proposed company, department, and member additions or removals, department renames, and member moves. For a new company, choose its Default credit group for the new company.
- Select Apply all, then review progress and completion. If accounts were created, use Download temporary passwords for new members (N) to save the results as CSV.
- If the operation fails, expand Upload failure log to inspect the step and error. Use Choose another file to select a corrected workbook if needed.
Synchronization scope: Previously synchronized members or organizations missing from the file can become deactivation targets. Do not submit a partial organization extract as a complete replacement. The interface explains that manually created companies and departments are excluded from synchronization deletion. Some steps may already be applied when a later step fails. Uploading the file again recalculates the remaining differences against the current state. An error does not automatically undo completed changes.
If editing is disabled, only the preview is available. Temporary-password downloads contain new-account results, not the full member roster or a credit-usage export. The Members and Enterprise Organization Management menus do not provide a full-roster Excel export button.
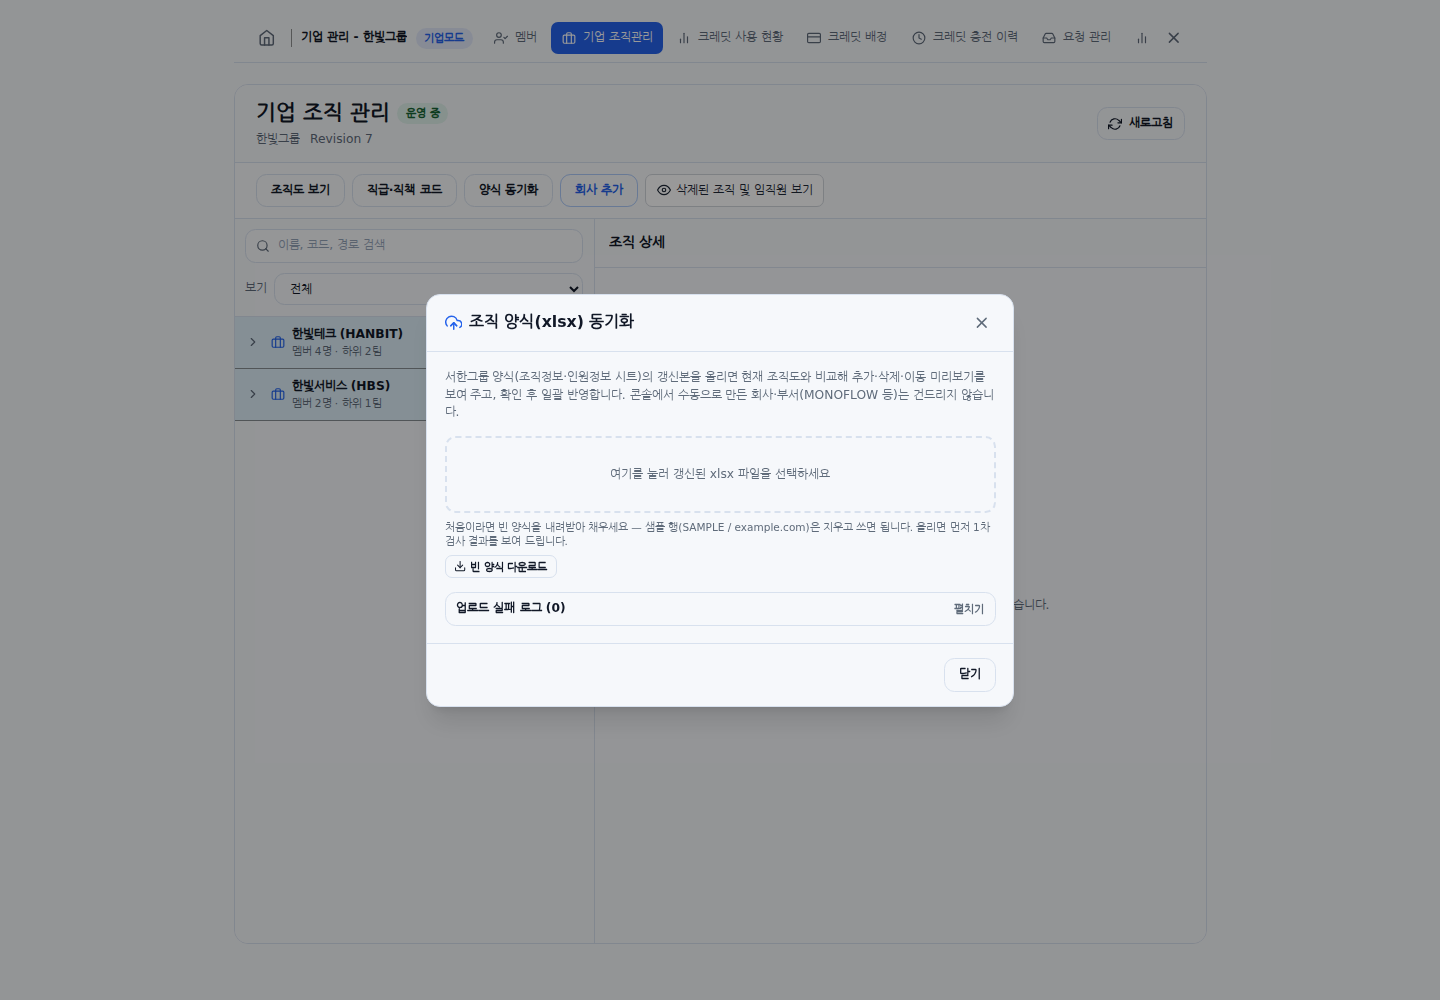
Korean interface with sample data. Check the full synchronization scope and validation results before applying changes.
Set display names for rank and position codes
- Open Rank and position codes > Rank and position code mapping.
- Find an entry with Filter by code or name, then enter its display name.
- To add a new code, select Add a code directly > Add row.
- Select Save. The original code remains unchanged and is displayed as Name (code). Saving an empty name removes its display-name mapping.
- If there are no codes, the screen shows No codes are used in current assignments. For an empty filtered result, it shows No codes match the filter.
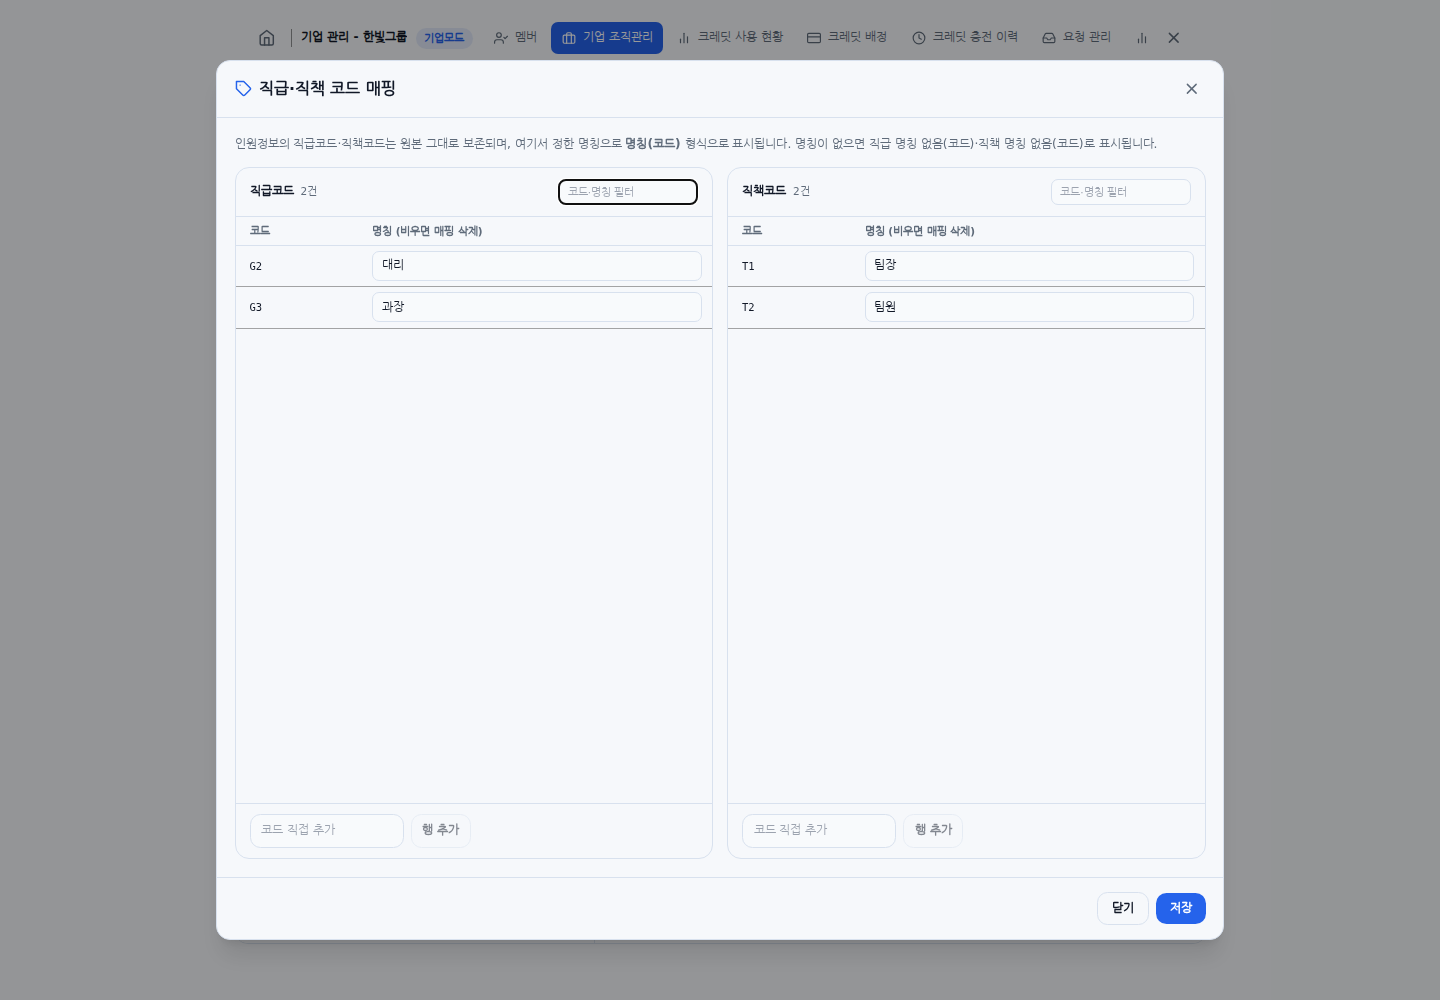
Korean interface with sample data. Display-name mappings change labels while keeping the underlying codes.
Was this answer helpful?