Connect Codex on Windows, step by step
Install Node.js, run the PowerShell commands and start Codex in a D: drive or external-drive folder, one screen at a time.
Updated: November 2026
This walkthrough is for Windows users who have never used a terminal. Follow it in order to use Codex with your MonoGPT credits. If you already know the terminal, the short Connect Codex guide is enough.
Before you start
- You do not need a new Google or ChatGPT account. MonoGPT connects with the API key you issue in MonoRouter, not with a sign-in.
- Keep using your Codex desktop app (ChatGPT Plus account) as it is. This guide sets up the Codex CLI that runs in a PowerShell window, as a separate MonoGPT profile. Both can be used side by side.
- The first setup takes about 20–30 minutes. Afterwards you only run the two lines under Next time below.
| Step | What you do | How you know it worked |
|---|---|---|
| 1 | Install Node.js | node -v in PowerShell prints a version such as v26... |
| 2 | Open PowerShell | The window shows PS C:\Users\yourname> |
| 3 | Issue a key in MonoRouter | The Codex quick setup panel appears |
| 4 | Run the panel's four commands | The Codex screen opens |
| 5 | Confirm the connection | MonoRouter usage shows the request |
Step 1. Install Node.js
The Codex CLI needs Node.js. If it is already installed, go to Step 2 and just check node -v.
- Open the official Node.js download page in your browser.
- Ignore the grey code box at the top (fnm, winget). Scroll down and click the green Windows Installer (.msi) button outlined in red. The version marked LTS is the right one.
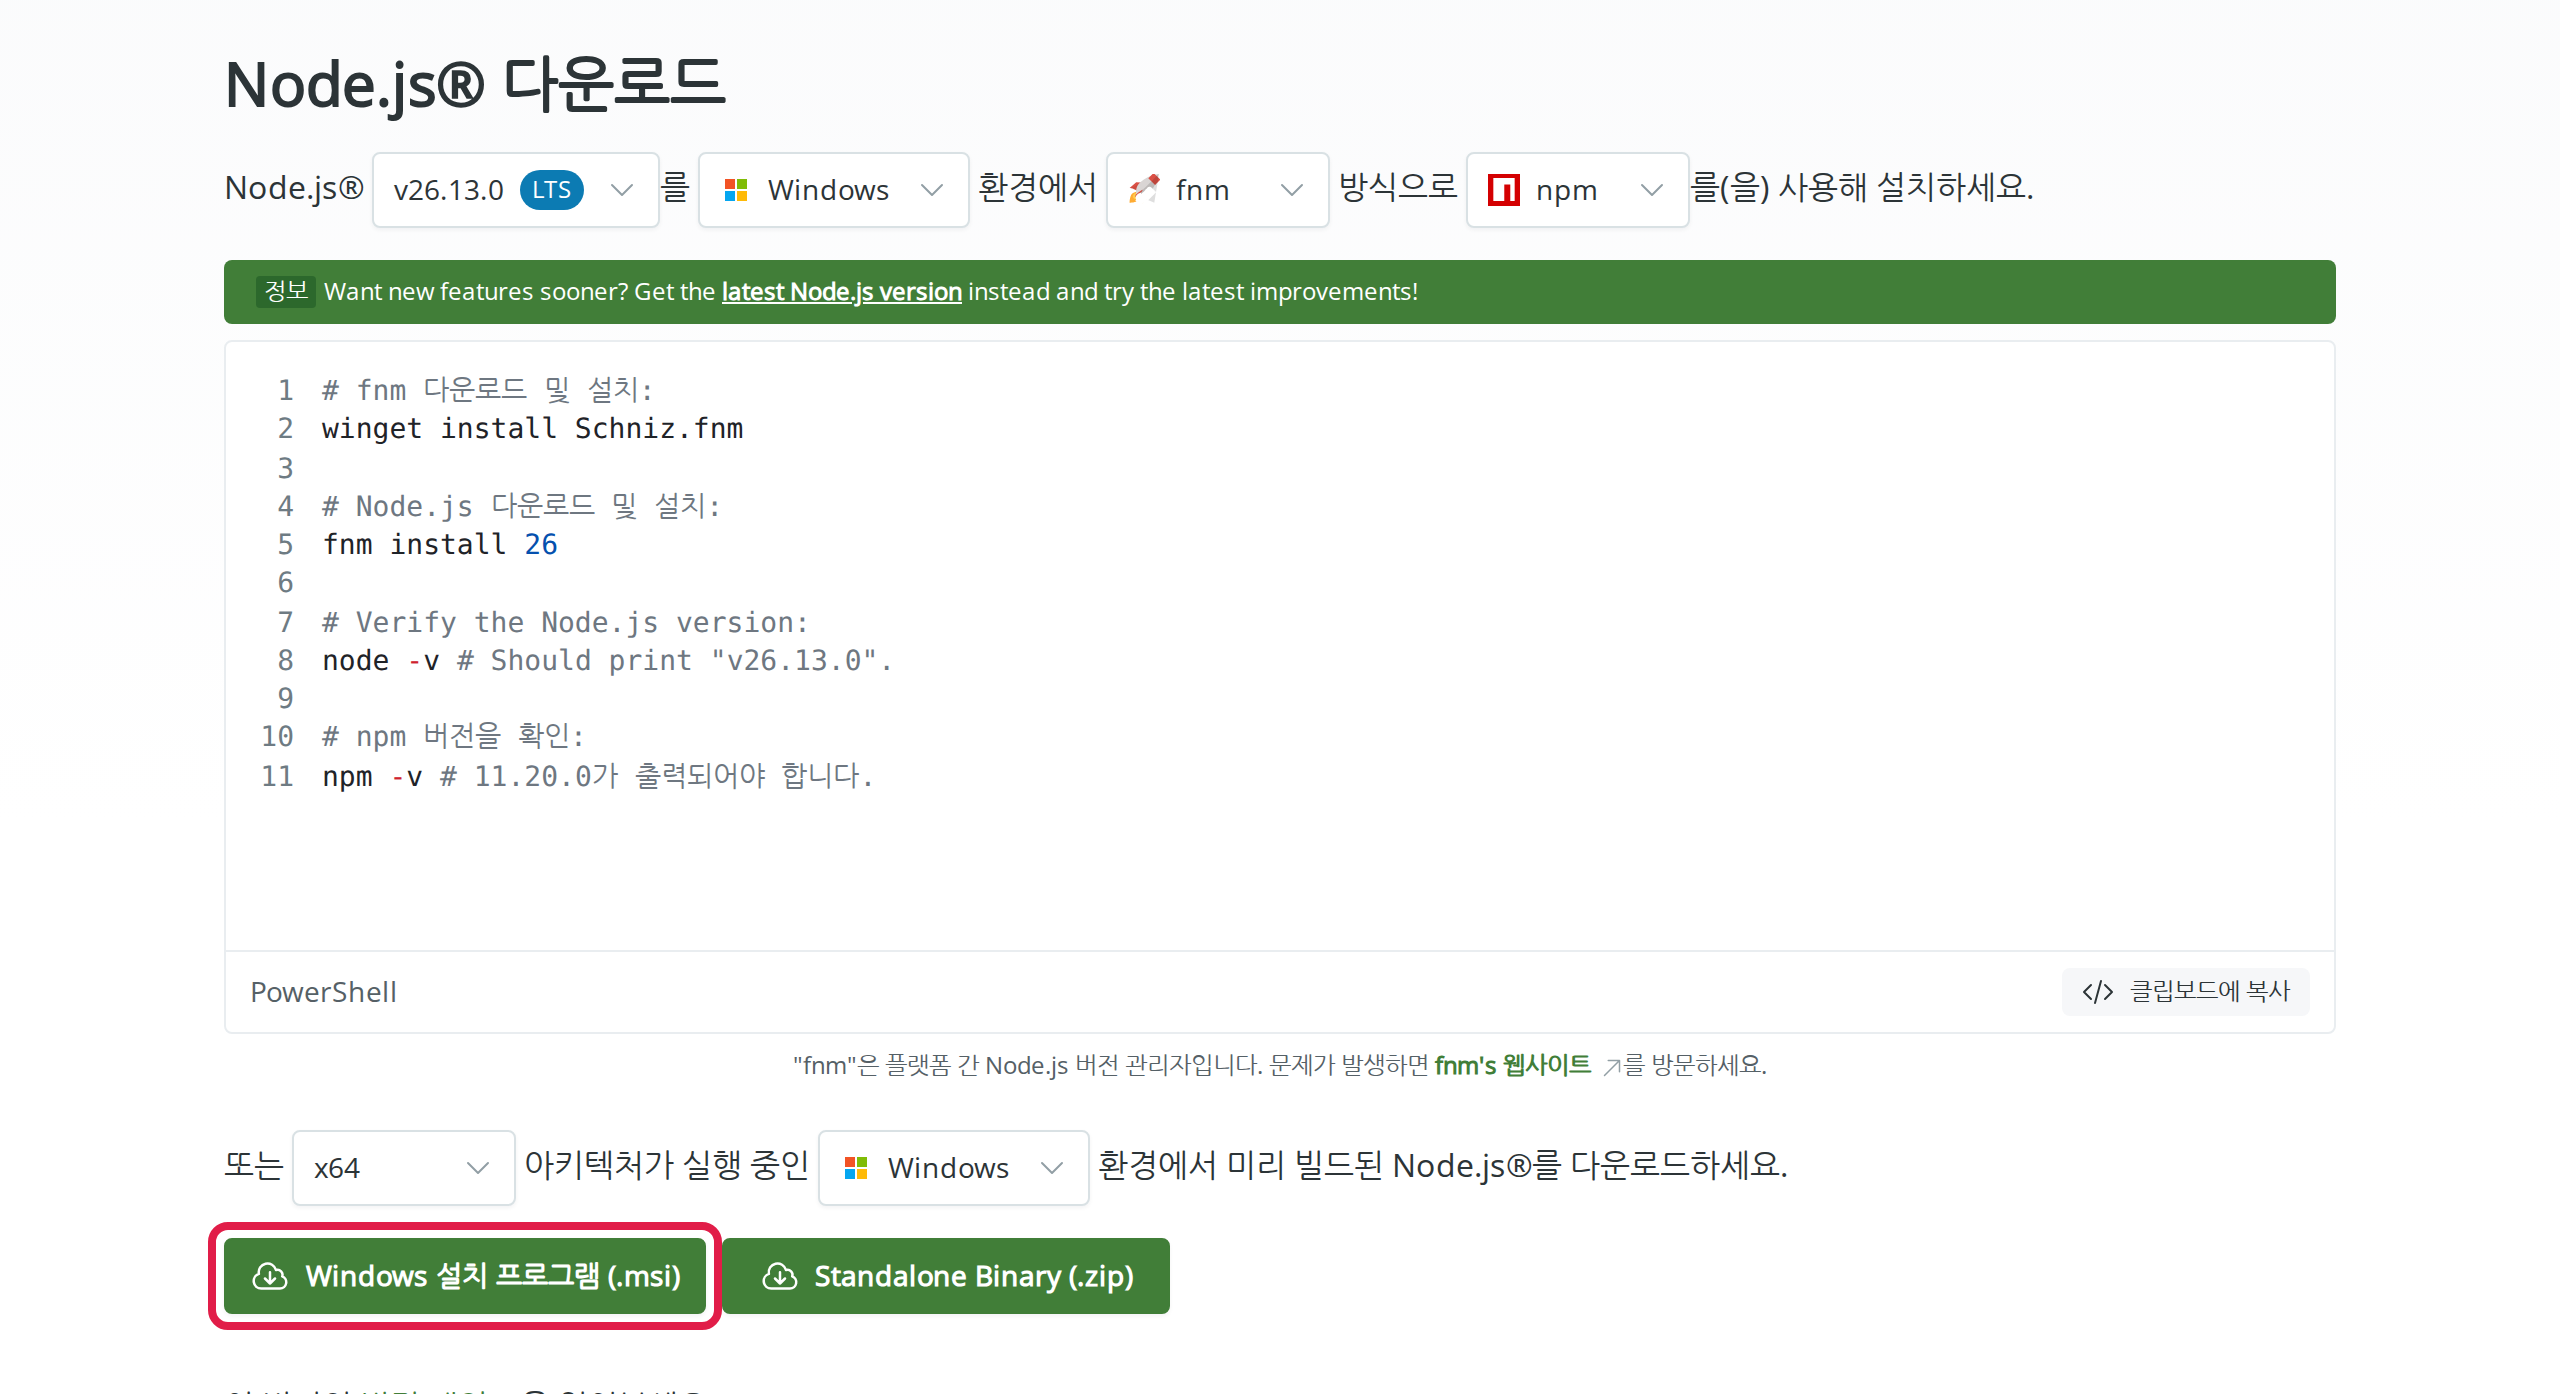
Captured from the official Node.js page as a Windows browser in November 2026. Only the red outline was added. Version numbers change over time.
- When the download finishes, double-click
node-v26.x.x-x64.msiin the browser's download list or in File Explorer → Downloads. - Click through the installer as below. Nothing needs to be changed.
| Installer page | Click |
|---|---|
| Welcome to the Node.js Setup Wizard | Next |
| End-User License Agreement | Tick I accept the terms in the License Agreement → Next |
| Destination Folder | Next |
| Custom Setup | Next |
| Tools for Native Modules | Leave unticked → Next |
| Ready to install Node.js | Install |
| User Account Control ("Do you want to allow this app to make changes?") | Yes |
| Completed the Node.js Setup Wizard | Finish |
Page names can differ slightly between Node.js versions; keep the defaults and click Next. The installer pages are described by button name rather than captured.
Step 2. Open PowerShell and check the install
Important: close every PowerShell window you opened before installing Node.js, then open a new one. Old windows cannot find newly installed programs.
- Press the Windows key or click Start.
- Type
powershelland click Windows PowerShell. Administrator mode is not needed. - When you see
PS C:\Users\yourname>, type a command after it and press Enter to run it. - Run these two lines one at a time.
node -v
npm.cmd -v
Two version numbers mean success, for example:
v26.13.0
11.20.0
Pasting: paste a copied command into PowerShell with a right-click or Ctrl+V, then press Enter.
| If you see | Do this |
|---|---|
'node' is not recognized as the name of a cmdlet, function, script file, or operable program | Close all PowerShell windows and open a new one. If it persists, restart the PC; if it still persists, repeat Step 1. |
npm.ps1 cannot be loaded because running scripts is disabled on this system | Type npm.cmd instead of npm. Every command in this guide already uses npm.cmd and codex.cmd. |
Step 3. Issue a key in MonoRouter and open the Codex panel
- Sign in to MonoGPT and open MonoRouter. It opens in a separate popup window. If nothing opens, allow popups for monogpt.kr from the blocked-popup icon in the address bar and try again.
- On the MonoRouter API keys tab, choose the ChatGPT API or Universal API card. Enter a label such as
My PC · Codexand click Create API key. The screen below shows the Universal API card; the ChatGPT API card works the same way.
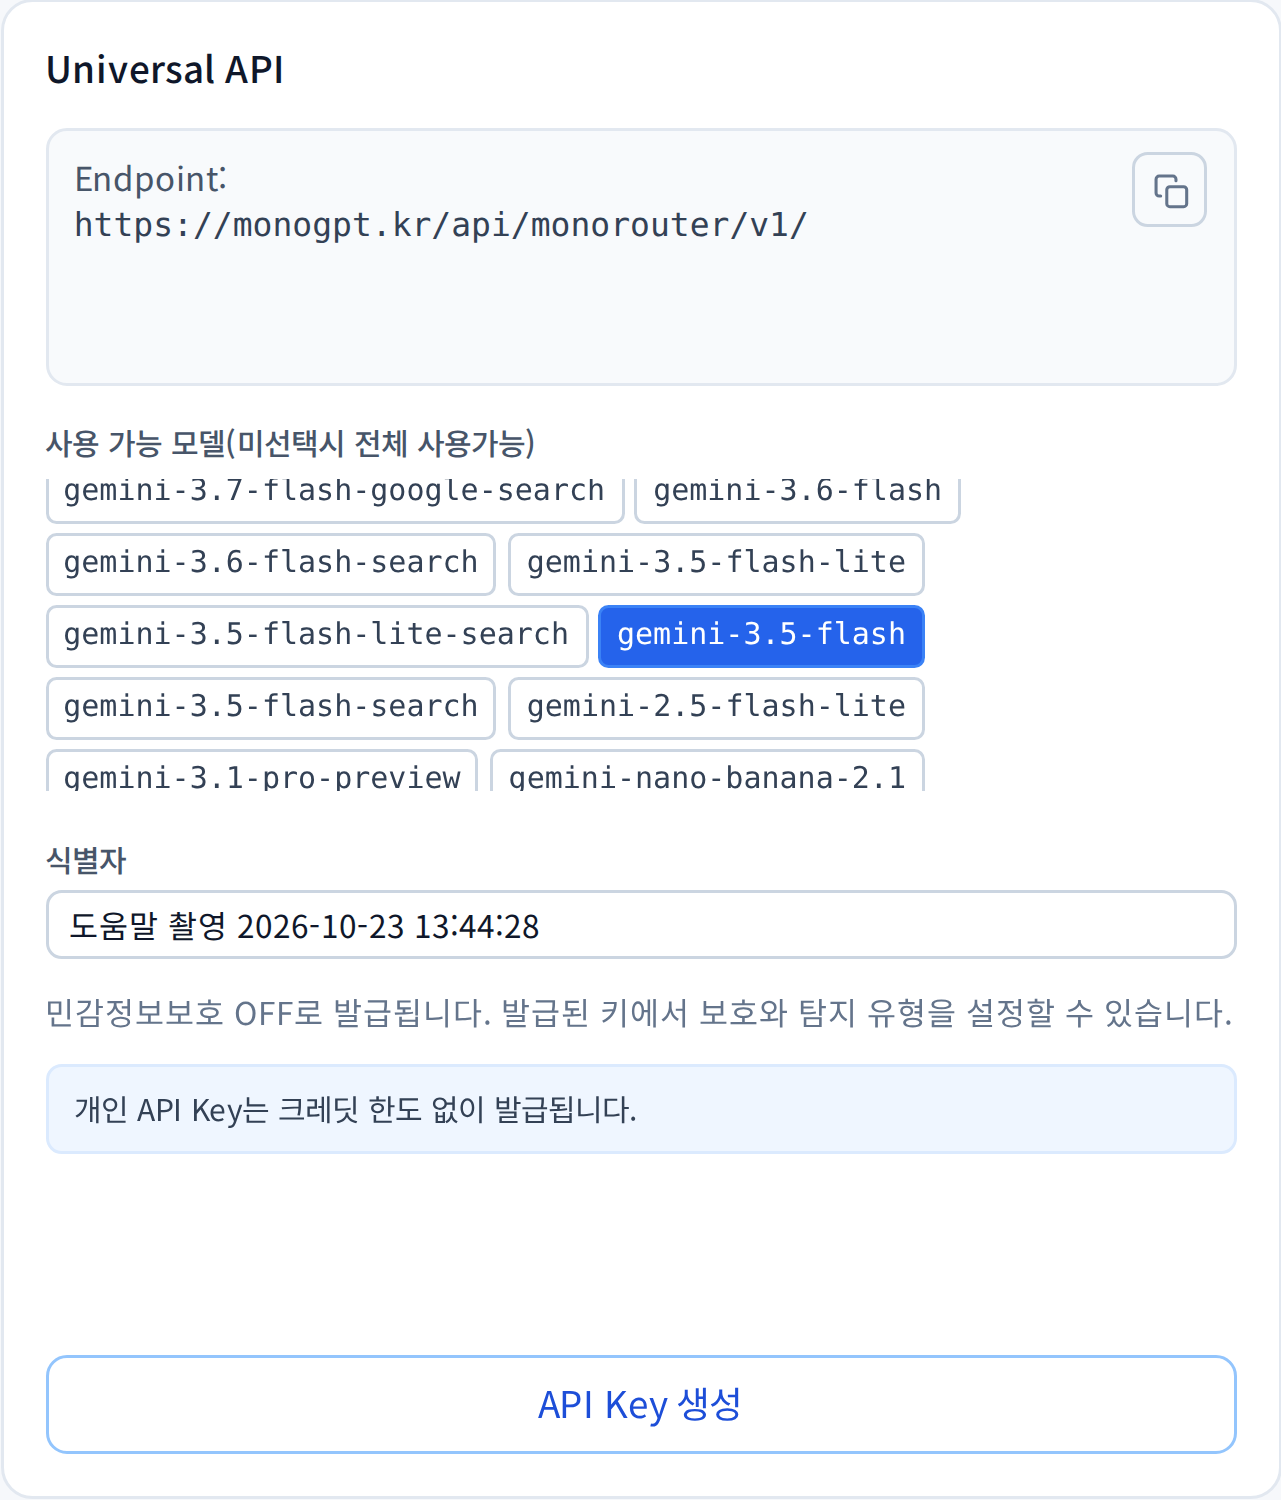
- When the new API key appears, click copy and save it somewhere safe, such as Notepad. You will need it next time.

- Scroll down the same window to the Codex quick setup panel. Change Terminal to Windows (PowerShell). Leave the model and the default Add a separate profile setup method as they are; this keeps your current Codex settings untouched.
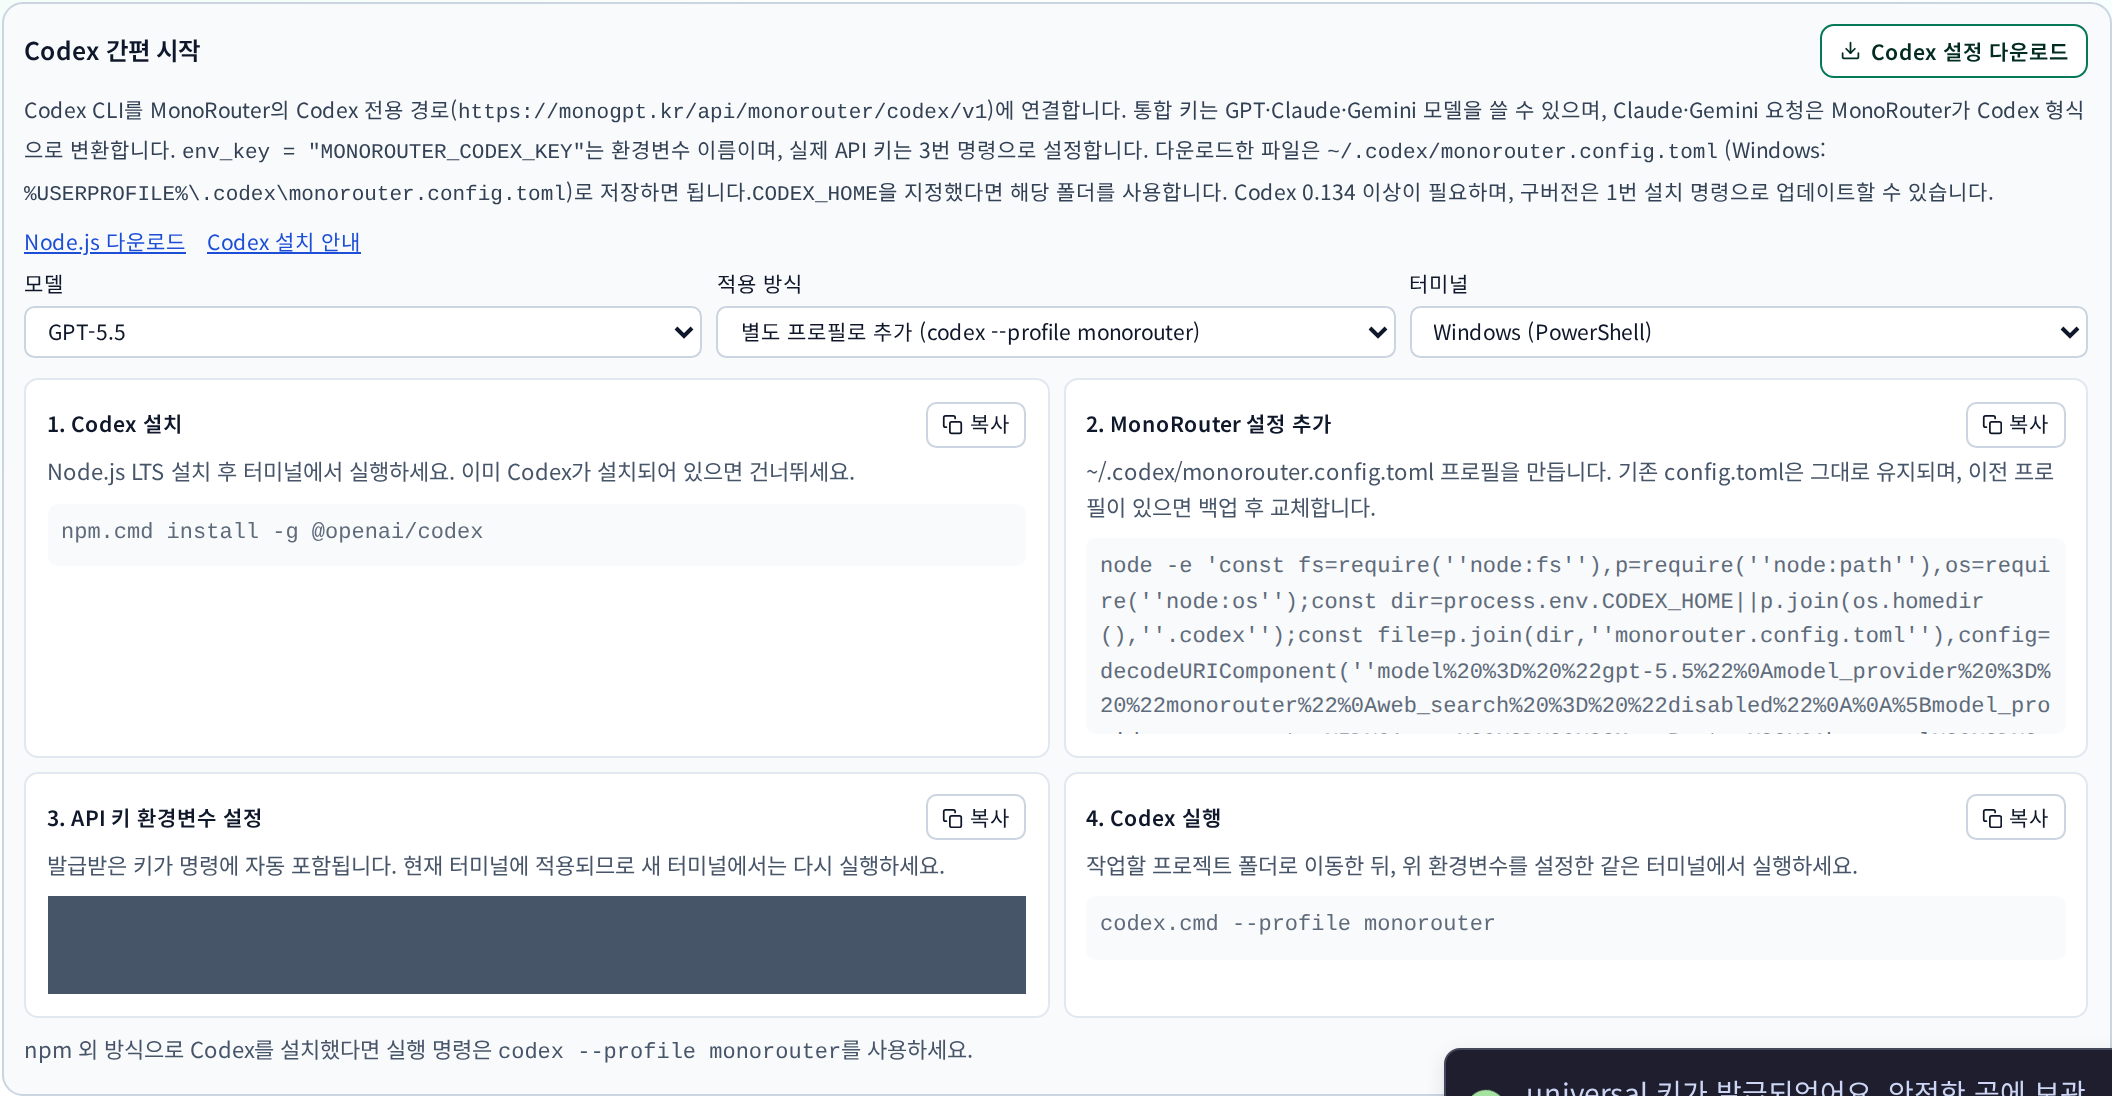
Live product screen. Box 3 is covered because it contains the secret key. Use the copy buttons on your own screen instead of typing from the picture.
No panel? It appears only right after issuing or reissuing a key and disappears when the MonoRouter window is reloaded or closed. If you did not save an earlier key, issue a new one. If you saved one, use set up with an existing key.
Keep the MonoRouter window open until Step 4 is finished. Place it next to the PowerShell window.
Step 4. Run the four panel commands in order
For each command: panel copy button → right-click in PowerShell to paste → Enter. Wait until PS C:\...> appears again before running the next one.
Command 1. Install Codex
Copy 1. Install Codex and run it. It copies:
npm.cmd install -g @openai/codex
It takes a minute or two. A final line starting with added means success; yellow npm warn lines can be ignored. To check:
codex.cmd --version
Any version 0.134 or later, such as codex-cli 0.134.0, is fine.
Command 2. Add the MonoRouter profile
Copy 2. Add MonoRouter settings and run it. It looks long; paste it as is. Success prints one line:
MonoRouter profile configured: C:\Users\yourname\.codex\monorouter.config.toml
MonoRouter profile already configured also means you can continue. This is saved on the PC, so you do it only once.
Command 3. Set the API key
Copy 3. Set the API key environment variable and run it. Your key is already inside the command.
$env:MONOROUTER_CODEX_KEY = 'mr_....'
Nothing is printed; seeing PS C:\...> again means success. The key applies only to this PowerShell window.
Command 4. Go to your project folder and start Codex
This works the same for folders on the D: drive or an external drive.
- Open the project folder in File Explorer. An external drive appears under This PC as, for example,
USB Drive (E:). - Click an empty spot in the address bar to reveal a path such as
E:\dev\myapp, and copy it with Ctrl+C. - In PowerShell, type
cd ", paste the path, close with"and press Enter.
cd "E:\dev\myapp"
When the prompt changes to PS E:\dev\myapp>, copy 4. Run Codex and run it.
codex.cmd --profile monorouter
The Codex screen opens. On first run Codex may ask whether to trust the files in this folder; for your own project folder, choose to allow it with the ↑ ↓ keys and Enter.
Run command 3 and then command 4 in the same PowerShell window. Command 4 alone in another window has no key.
Step 5. Confirm the connection
Ask something short in Codex:
Explain this project's folder structure. Do not modify files.
Then check MonoRouter usage for a request at the same time. Test questions also use credits.
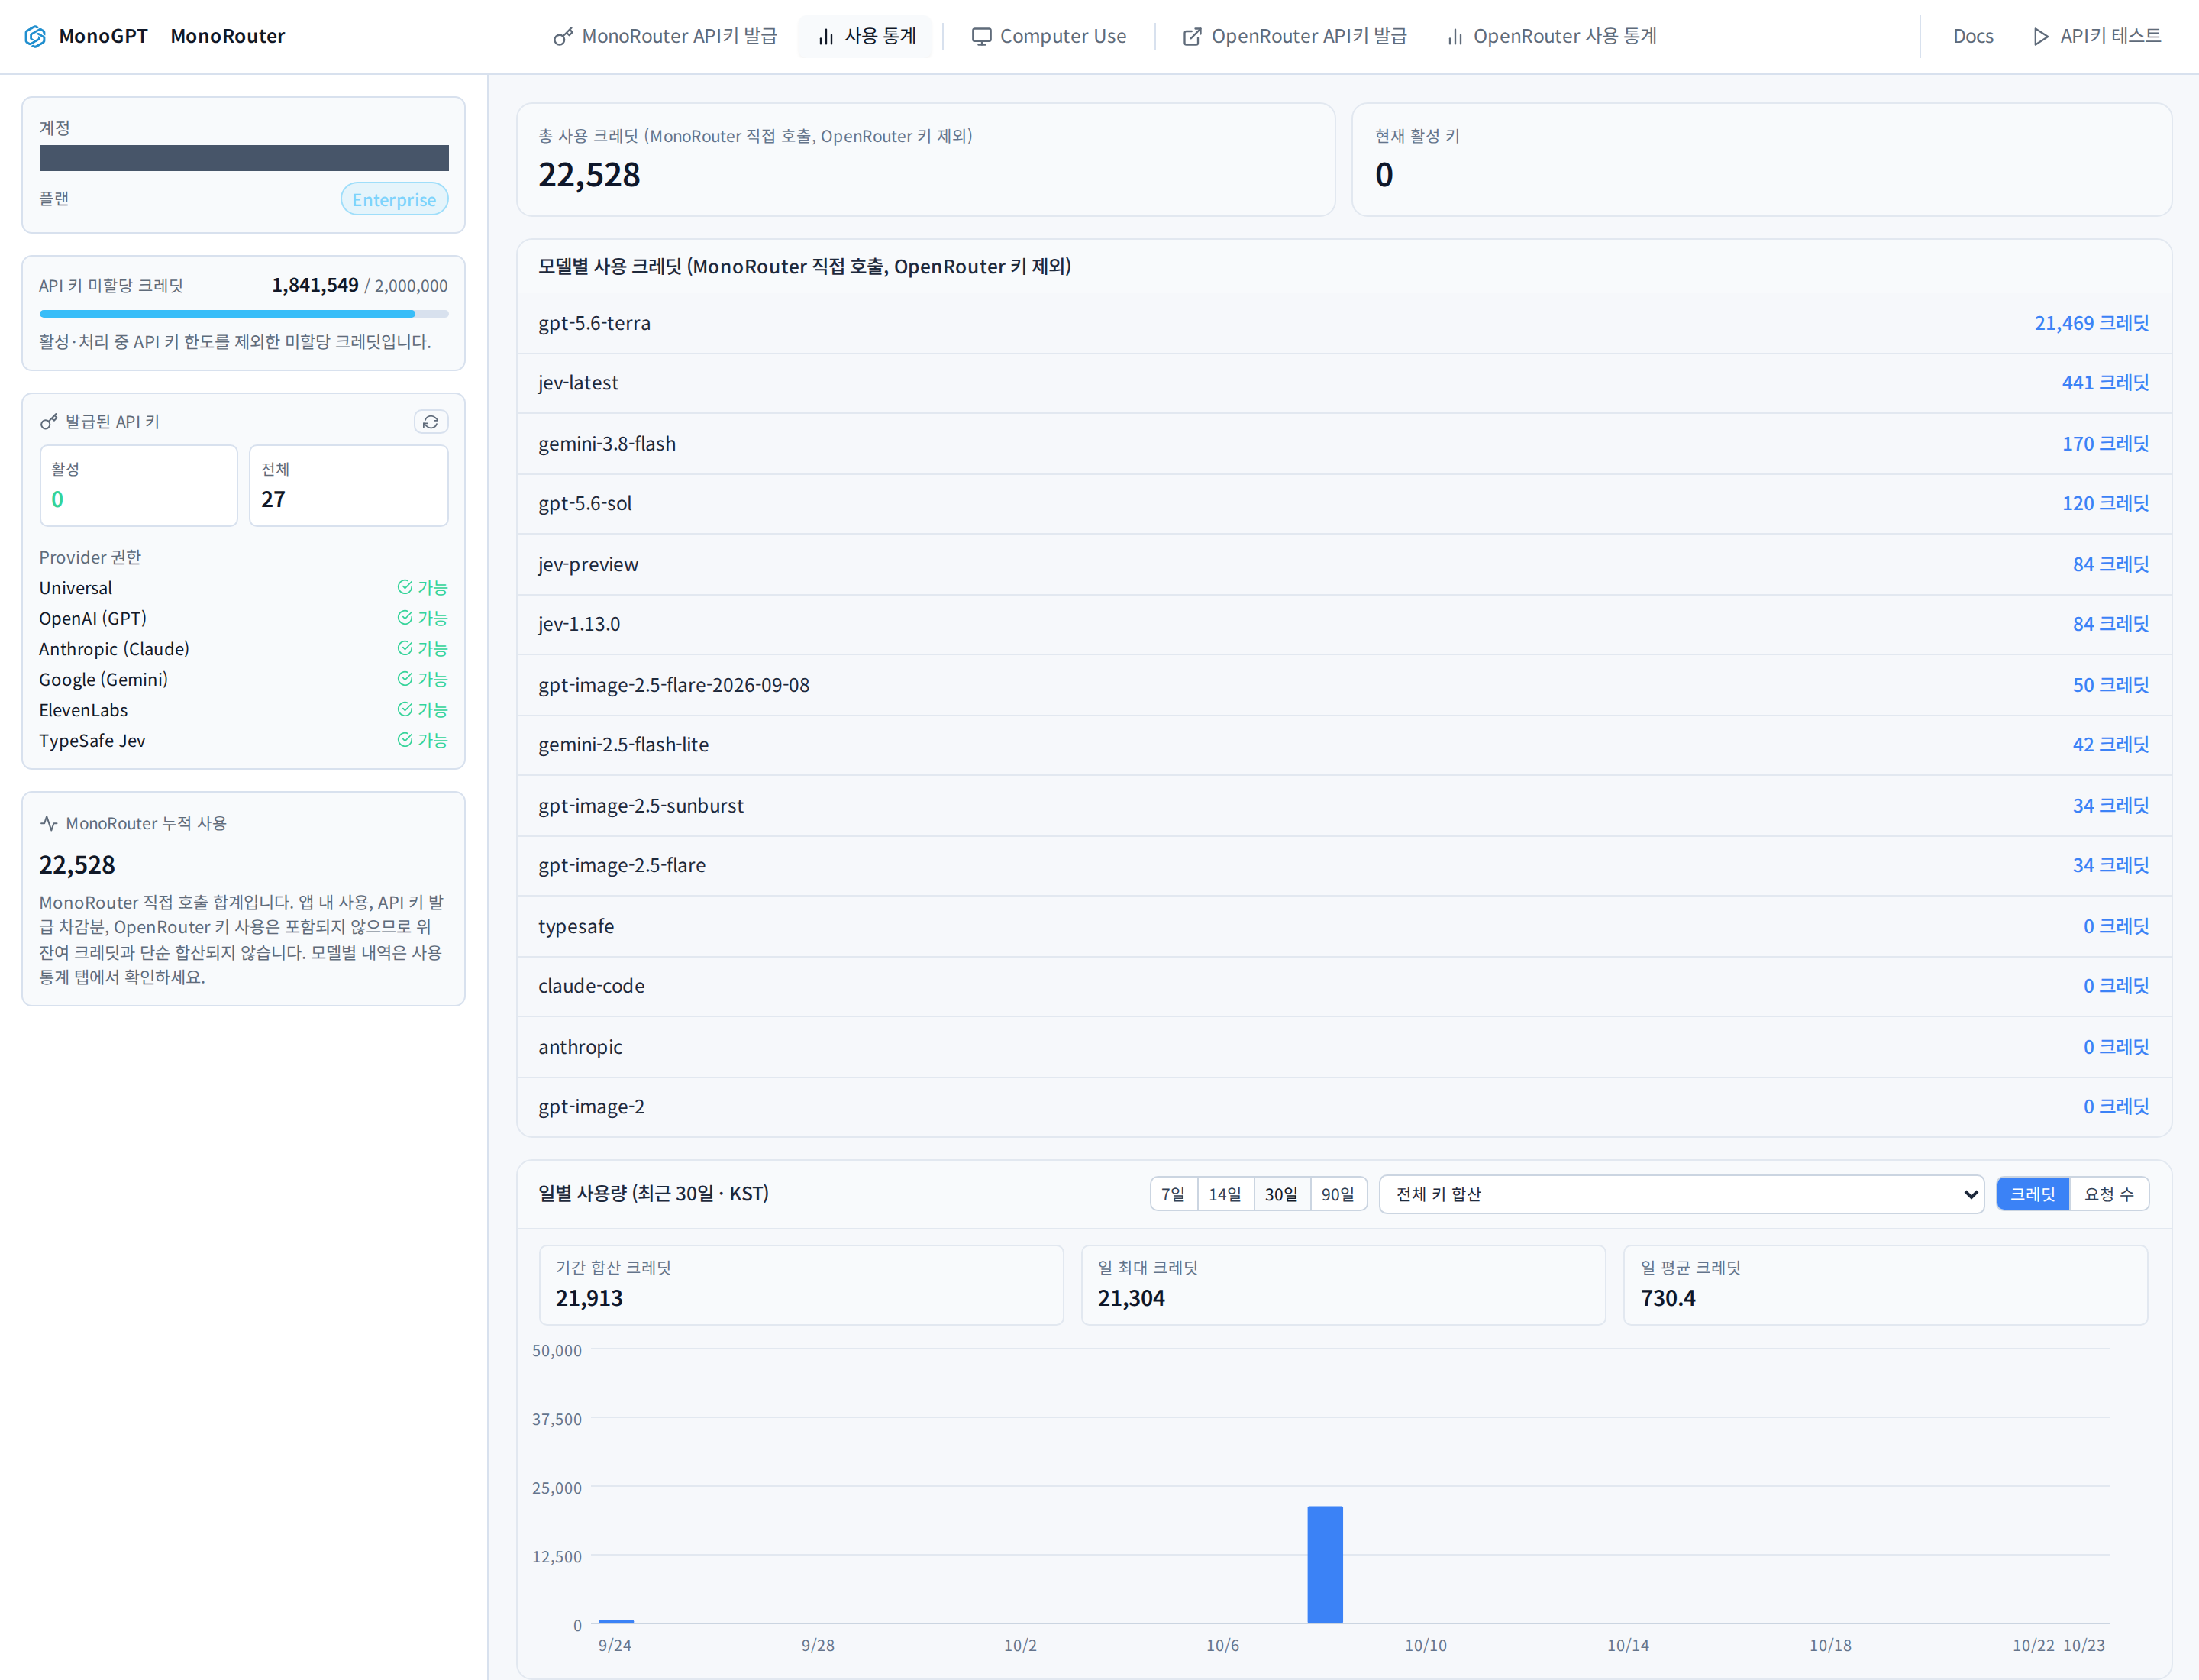
To quit Codex, type /quit or press Ctrl+C.
Next time
Commands 1 and 2 are not needed again. Every time you open a new PowerShell window:
- Set your saved key, replacing
YOUR_ISSUED_KEYwith the full key.
$env:MONOROUTER_CODEX_KEY = 'YOUR_ISSUED_KEY'
- Go to the project folder and start Codex.
cd "E:\dev\myapp"
codex.cmd --profile monorouter
To avoid entering the key every time, run this once to store it for your Windows user, then close and reopen PowerShell; afterwards only step 2 is needed. Do not do this on a shared PC.
[Environment]::SetEnvironmentVariable('MONOROUTER_CODEX_KEY', 'YOUR_ISSUED_KEY', 'User')
Running codex.cmd without the profile, or the Codex desktop app, keeps using your ChatGPT Plus account. Add --profile monorouter to use MonoGPT credits.
Common problems
| Symptom | Cause and fix |
|---|---|
| The MonoRouter window does not open | The browser blocked the popup. Allow it from the address bar. |
| No Codex quick start panel | It appears only right after issuance or reissuance. See Step 3. |
'node' or 'codex.cmd' is not recognized | The window predates the install. Close PowerShell, open a new one and retry. |
npm.ps1 cannot be loaded | Use npm.cmd instead of npm. |
Command 2 says node is not recognized | Node.js is not installed yet or the window is old. Recheck node -v in Step 2. |
401 or key error after command 4 | Run command 3 first in the same window. If the key was deactivated or reissued, run command 3 with the new key. |
402 error | Credits or the key limit ran out. See usage and troubleshooting. |
cd cannot find the path | Wrap the path in ", make sure the external drive is connected and the drive letter is correct. |
Still stuck?
Send the following through 1:1 support:
- The step and command number where you stopped
- A screenshot of the PowerShell window: press Windows + Shift + S, drag over the window, then paste it with Ctrl+V in the inquiry form
- Never send the full API key. Cover it in the screenshot.
Connect Codex (summary) · Issue and manage API keys · Usage and troubleshooting
Was this answer helpful?